Showing posts with label Product Review. Show all posts

Sunday, July 12, 2009

Personal Product Review: Table Top Cutter

Today I would like to tell you (again) about the Stampin' Up! Table Top Cutter.

I know there have been tons of reviews on this product but now that it's avaialbe to order through Stampin' Up! again I thought I would share with you what I think of it.

I have both versions of this cutter (the orange/grey Tonic version & the black/grey Stampin' Up! version) and I really LOVE them!

It is my GO-TO cutter whenever I'm working on anything - even the kids school work!

I can say this after having done lots of hands on research for paper trimmers/cutters in the past - I think I first reviewed this one in 2007 and it's still my favourite! See this POST.

Here are some details:

The rulers are in CM and Inches.

The first measurement across the top of the base is 3/4" and the last measurement is 6". It's not marked with a 6 but you can easily tell that it is 6".

They both have rulers again at 5 1/2" and at the very bottom going across the base. The base is done in 1/2 squares (grid) and the grid goes to 5 1/2" and all the way down to 12" (these are not marked with numbers only debossed/imprinted grid lines on the base).

For this reason I prefer the Stampin' Up! model over the Tonic orange and grey - the ruler at the top of the Stampin' Up! is silver with black print/lines and easy to read. The Tonic ruler is done in orange with the lines/print as debossing/imprinting to the grey.

This cutter fits in my bag easily - but I have the "Junior" Crop in Style bag!
Saying that I want you to know that it's not flat like the usual track timmers but is approximately 2inches high and measures 7 x 16 inches.

Most of the time I use mine WITHOUT the end handle piece or the attachable measurement arm - I'm just lazy!

One complaint I have is that the handle gets "loose" after time. This happened quite quickly with my orange Tonic version and so I bought the Stampin' Up! one. Again this happened quickly. The solution is to attach an Allen Key to the bottom of your trimmer with masking tape and use it to tighten when necessary.
The other complaint is that you have to get used to pressing down on the finger guard before you cut! But once you use this cutter a while this will become automatic.
You CAN:

- cut paper into really thin strips

- cut through multiple pieces of paper at once (I do 3 at a time)

- the cuts are sharp and clean regardless of paper used (I'm referring to the fraying problem cutting Whisper White with the track trimmers)

- the blade is self-sharpening!

- cut through light chipboard & plastic sheets
You CANNOT:

- score with it

- make cut-outs - like frames or windows.

I hope this info helps anyone who is considering this cutter or has a customer that needs more info.


Tuesday, March 31, 2009

Calling all Liquid Applique Lovers!

I love to use Liquid Applique!
I first discovered it when Stampin' Up! carried it and when they stopped I would order it from Close to My Heart whenever I needed some.
Every once and a while I would find a retailer that sold it and I'd buy some for my stash.
But I had no idea that I was using incorrectly!
Seriously!
Check THIS out and you too may be amazed!

Big Shot Tips!

I've been using my Big Shot for a while now and I'm fairly comfortable with it.

But I have to say that some of the basics I take for granted.

So just before teaching a recent Big Shot Sampler class I asked some of my fellow Stampin' Up! Demos and other Big Shot users to send me their tips and reminders that I could pass along to NEW Big Shot users.

Here are some tips that I compiled from my own experience and their replies:

1. The Big Shot machine comes with 2 clear plates. Right off the bat mark one for cutting. Use only the cutting mat on top of your sandwich stacks. Be sure to rotate the cutting plate back to front and side to side.

It is normal for your cutting plate to get "cut up" with marks from your dies.

BUT if your cutting plate starts to curl do not attempt to flatten it with your heat tool or by running it through your machine "bump" side up in a tight stack. It may crack and break!

It is still useable with a curl but you are now committed to running it through your machine with the ends curled up. You may also have to push the curled up end down to start your stack when running it through your machine.

Ideally it would best to have 3 plates on the go - 1 for cutting, 1 for the bottom of the stack and another 1 to use for embossing only as a top plate.

2. Each machine is slightly different. Each user should play with their machine to "get to know it". Don't be alarmed if the recommended sandwich stack does not work in your machine. Simply experiment and make adjustments.

3. Once you get to know your machine you may want to run some samples through and record on them your unique recipes if different from the MPP. You may also want to make your own laminated "recipe" shims and keep them with your machine.

4. If you are using patterned or textured paper the "good side" must face your die unless you want a mirror image - especially important when cutting alphas!

Same goes for the embossing folders - "if" it's important that the patterned side of your paper be embossed rather than debossed make sure you load it face up and have the folder's logo be face up as well - on the Cuttlebug folder the top side is the side that says Cuttlebug and Provo Craft on it.

5. It is recommended to run your MPP binding end in first.

6. Push your stack through slightly to get the "kick" from your handle to see which way to crank it.

7. If the handle is not pulling through your sandwich check:
a. your handle to see if it is properly tightened
b. your top plate to see if it is curled up and catching on the roller

8. It is normal for some stacks to "crack" when using dies such as Nestabilities. That noise is the sound of the paper being cut. A crunching/splintering sound is not normal especially if you are struggling to crank your stack through. This means that your stack is TOO TIGHT and you should adjust by taking a layer out (tab, shim etc).

9. When using embossing folders there may be descrepancies in sandwich stack instructions. Sizzix says Tab 2, Cuttlebug may be Tab 1 or no Tab. I personally use Tab 1 for all types of folders but it depends on the paper being embossed and the tightness of your machine.

10. Steel rule dies will cut all kinds of material. There is no need to use a silicone mat with these dies unless you want to cut through them!! You need the silicone mat for the texturz plates or embossing Nestabilities (but be forewarned that the blade will leave an impression but should not cut through).

11. It is normal for the Crease pad to become slightly marked up as well.

12. I printed out labels and attached them to my Crease pad with the stack for my machine and to my SHIMS with "SHIMS DO NOT THROW OUT!".

13. When using Texturz Impression plates spritz your paper with water to get a better impression.

14. For you visual girls click HERE for an awesome video!

I hope you find this info as useful as I have when using your Big Shot machine.

If you see something that needs clarifying or correcting please let me know.

Saturday, November 8, 2008

Poor Girl's COPIC Air Tool

Alysabeth asked if the Stampin' Up! Spritzer Tool worked with the COPIC markers.

The Colour Spritzer Tool (#107066) is made by Inkworx and sold by Stampin' Up! on page 193 of current catalogue for $16.50 CAD.

Well some of us over at the COPIC CRAZY Yahoo Group got to thinking and experimenting with ours.

I thought at first - no way - the barrel of the COPIC marker is too thick to fit in the Color Spritzer Tool holder.

BUT WAIT - Bridget discovered that there are two parts to the holder and once you take the screw out (or loosen it) the inner part can be removed allowing the Sketch marker to fit!

I had to try this myself and it works like a charm!

If you keep the marker barrel flat you can tightern the screw to keep the marker in place.


Since I have both Original and Sketch markers I tried the Original COPIC marker and it fits too!

You just need to take the screw out completely but it does fit in there nice and snug!

I used the Chisel Tip end of the marker for this and it works very well as long as longest point is right against the spout of the spritzer tool.

Just a word of warning - I don't know this for sure but I suspect that using an air tool may dry out your markers faster than just colouring with them!

Please note that this is a manual pump tool and so the results will not be the same as the constant air pressure from the COPIC system.

Wednesday, September 17, 2008

You've all heard of burning rubber...

Today I'm going to tell you about burning ribbon!

Well, not really burning it but melting it a bit so it doesn't fray.

I learned this technique from Lisa at Local King. She always has her lighter handy because she HATES frayed ribbon and now I do too!

For this you'll need either a torch style bbq lighter or a regular lighter.

I prefer the torch style because the flame is "hotter" (comes out blue like a torch) and it's quick without setting your ribbon on fire!!

This photo below is of Taffeta ribbon that I just cut from the spool.
You see how it's already kind of fraying?
This will only get worse the more you manipulate it for knots and bows!

Here it is after I "torched" it.

Not much difference to the naked eye but if you feel it you'll feel that it has kind of a melted edge and will now NOT FRAY!!

This is a photo of grosgrain ribbon cut from the spool.

Here it is after I "torched" it.

This photo really shows how it's melted and now won't fray!


It works well for almost any ribbon!

BUT BE CAREFUL - EXTRA CAREFUL with organdy ribbon because it starts to burn (I mean FLAME) very quickly.

And you do have to be careful with lighter coloured ribbon keeping the flame off the actual ribbon. It's more of a melting with the heat source coming close but not touching the ribbon!

I encourage you to try it - with some scraps.

I'm sure you'll like it better than the "unintentional" frayed ribbon look and you'll add a lighter or torch to your tool kit. I did!

Saturday, July 19, 2008

Which Glitter? Which Glue?


I have so much glitter in the house - seriously you'd think that fairies and pixies lived here!!

I thought I'd put together a bit of an information post for glitter to help others that might be venturing into the wonderful world of glitter! OR even those that have tried it in the past but have forgotten how great it is!

First of all - I don't have to tell you that glitter can be MESSY! But it doesn't have to be too messy if you prepare a bit before. Regardless of what you do - you will end up with some glitter on yourself and will look like a "disco queen wannabe" by the time you're done!
It happens to everyone - someone once said that glitter is like the herpes of the craft world!

I like to work on a self healing mat so that I can clean up easily. I also like to use a piece of scrap paper (folded in 1/2) to catch the excess glitter. If you are working with multiple colours/types then you should have a separate piece of scrap paper for each one so you don't cross-contaminate your glitter.

For clean up there is the Glitter Clean Up Cloth - which is great for "picking up" glitter.

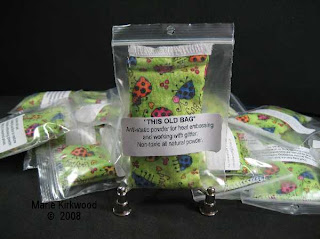
To help keep yourself and your project static free I like to use a anti-static pillow like "This OLD BAG" which I sell at Scrap Arts or through me directly (just email me). It's great for working with glitter and embossing powders.
The type of glitter you select for a project really depends on what you want to achieve.

Textures:
Microfine - micro particles of glitter perfect for creating the Burnished Velvet look
Ultrafine - fine glitter smaller in size than regular craft glitter but more brilliant than the Microfine
Chunky/Craft - Chunky glitter is a larger cut for more brilliance but a bit harder to adhere

Effects:
Opaque - this glitter will cover whatever color it is applied on/over
Transparent - this glitter is see-through and it's outcome is affected by the color beneath it
Transference - this glitter will have an underlying colour and when applied on certain colours will show through - example - Warm/Cool/Green Highlight glitter
Perlescent - this glitter can be both opaque and transparent but it has a "satiny" pearl like finish. "PearlEx Micro" for example can easily be mixed with glues and sprayed on using hairspray for a subtle effect.

Glitter comes in all kinds of containers too. For the most part I keep my glitter in it's original container but if you find that you are using more of one particular colour - like red at Christmas or white/highlight glitters for snow - then you may want to transfer them to bigger containers with snap lids for ease of use.

Application:
There are lots of adhesives available that make applying glitter easy. You just need to find the right one for your project and the look you want to achieve.

Sakura Quickie Glue Pen - This is one of my favorite ways to apply glitter - it's both quick and easy! You can highlight a small section of a stamped image or patterned paper by drawing where you want the glitter to go. Apply liberal amounts of glitter over the glue and tap to remove excess. It goes on blue so you know where you've applied it and it dries clear. ($4.99)

Tsukinkeo Essential Glue Pad - When working with stamps this is the quickest & easiest way to apply adhesive. It works just like an ink pad. "Ink" up your stamp with this adhesive and stamp onto your surface. Or you can apply the glue pad directly to your project or chipboard piece. Apply glitter. This type of adhesive is an easy option when working with solid image rubber stamps and a lot less messy than liquid glues when working with chipboard. The only downside to this glue pad is that the pad comes uninked (a reinker bottle is included) and you might have to re-ink it before using each time ($10 - $15).

Liquid Glues - There is a lot of different types of liquid glues available and you probably have some in your house. BUT I have to WARN you that not all liquid glues are the same. Some have higher water content than others which can cause your paper project to buckle and warp.
The 2 liquid glues that I like to recommend are:
  • The Art Institute - This liquid glue is made by the Art Institute (in Arizona) and is designed specifically for use with glitter. Read the labels carefully as some of this brand of glue dries Clear and some dries White - both have their benefits when used properly. On the downside this glue is hard to find and somewhat pricey ($15.95 for 4 oz of Dries Clear glue).
  • SOBO - Made by Delta and available at most craft stores. This liquid glue dries clear and does not warp paper. It's very reasonably priced as well ($3.99 for 2 oz or $14.99 for 16 oz)

Fabric Dimensional Paint - this is a fun way to apply glitter when you want it to have some dimension!! It may take a bit of practice and it's almost like cake decorating but you can make some beautiful results using this. I prefer to use the white or the transparent clear rather than colours. Although using the coloured fabric dimensional paint is awesome when working with the "highlighted" Transference glitter. It's a fun surprise to see what colour you end up with! (Tulip Matte Dimenisoal Fabric Paint $4.97 for 4 oz).

Double-sided Adhesive Tape/Sheets - Double sided adhesive tape/sheets are available from many different manufacturers and are great for adhering glitter over a variety of surfaces. This product can be free hand cut with an exacto, die-cut or punched to create fun shapes that can be applied to your project and then covered with glitter. You can even cover a stamped or patterned piece with an entire piece of the adhesive tape and apply the glitter on top for an overall effect. I've used the Sookwang tape and highly recommend it. It is available in many different widths and is very sticky - perfect for glitter.

Other Suggestions:
- Use regular acrylic paint! Most of us have some of this stuff lying around... Just apply a liberal coat to your project and then quickly add your glitter before it dries.
-Glue dots - any size will do! Just apply in a row or pattern and then add glitter. It's a quick and easy way to add a bit of punch to your project!

Right now I'm in LOVE with Glitter Ritz glitter Grasshopper and Garnet in the Micro Fine!

I'm considering using both of these on my Christmas cards this year!

Friday, October 19, 2007

Paper Trimmer Review

I have 3 Fiskars track type blade trimmers (including the SU! one), I have the LARGE Fiskars rotary trimmer (bought it at Cosco years ago), and in July I bought the new SU! table top guillitine trimmer (it's the same as the TONIC one).

I like all my trimmers and can't seem to get rid of any of them.

I have to say that I LOVE the new SU! table top trimmer. I wasn't sure if I "needed" another paper cutter but now I have it out all the time and it's become my GO-TO trimmer. It cuts cleanly and thinly. It's precise and sharp every time I use it. It's perfect for cutting the SU! white paper that frays with the other trimmers, also for cutting photos without leaving marks, and for trimming up excess teeny bits on card layers.

I can cut up to 3 sheets of SU! cartdstock without trouble. The important thing to remember is to always push down on the plastic guard to hold the paper firmly before you push the blade down.

However, I will not give up on my other trimmers because they have their uses too.

My Fiskars Rotary blade trimmer is my work horse and I can cut more than 3 sheets of cardstock at a time. Depending on thickness I can cut up to 6 sheets at a time and it's great for class prep.

My Fiskars triple track blade trimmers are compact and good for hand scoring with a stylus (I HATE the scoring blade and never use it). I'm not perfectly happy with the quality of the cut they make but they're portable and convenient. Since I have 3 of them I take them with me to the classes I teach as "extras". A lot of the classes I run are for beginners and unbelievably some of them don't have/bring a trimmer! So these are the perfect trimmer for people to learn on.

I do have a Score-Pal and use it all the time at home. But for portability and convenience I do take a triple track trimmer with me to classes I participate in for both paper cutting and scoring (with my stylus). It's a good 2-for-1 tool!

So even though I have all these trimmers each one has it's use and no one will replace the others.

What kind of paper cutter/trimmer do you have? Are you happy with it?

Go ahead and post a comment on your trimmer here - share what you love about it/hate about it.

I'd really like to hear your opinions on trimmers!