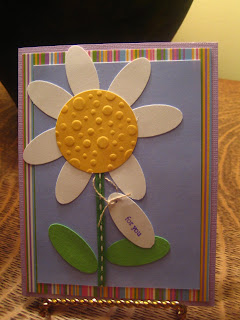
BUT I did have a few minutes this afternoon to make 3 cards and finish off an embossed tin project (I'll post that later).
The cards are for my upcoming DRY EMBOSSING class at the scrapbooking store. I'm trying to do dry embossing with a twist (sounds like my idea for the Heat Embossing class!). I'll have my light box at the class for display but I'm going to try and do this class without it. Not everyone has a light box and although there are some clever alternatives - like using your window (in the daytime) and using a pyrex with christmas lights or a flashlight underneath (at night) - I want to show different ways to dry emboss without investing in a lot of equipment.
I use some SU! stamps (new and retired) but I have to use the store's paper (Bazzills & American Crafts).
Before I break down each card I want to share some quick tips.
1. rub your paper to be embossed with waxed paper to help the stylus glide.
2. rub your stylus on your head (I'm serious about this) to give yourself a quick head massage (just kidding about this part) and help the stylus glide (are you getting the idea that the stylus needs to glide?).
3. Use a mouse pad or a piece of fun foam to dry emboss on.
4. Always emboss from the back of the paper - especially when using a stylus because it leaves marks!
5. If you don't have any brass embossing templates look around your house for other items to use or punch shapes and use that as a template.
6. Do a search on the internet and learn more interesting things about dry embossing.

The first card is a quick sample of dry embossing using a FISKARS texture plate and an impressor stylus. I just embossed the yellow centre part with the dotted texture plate. You can do this with anything textured that you might find around the house like an onion bag, chicken wire, screening, carpet anti-slip rubber, mesh, and lots of other things too. I made the flower petals & tag with the SU! small oval punch.

The second card is dry embossing with vellum. I stamped an image (daisy) on a piece of paper, lay the vellum over it and then traced it with the stylus. I coloured it in with marker (from behind) and then added a pop dot to the middle. I added a freehand embossed line border around the daisy to finish off the vellum piece. I layered the vellum on pink and then on white matting. On the pink mat I added some faux stitching with a push pin and a white gel pen (Uniball Signo gel pen is the BEST!). I used the stylus again with a SU! classy brass embossing template to make the flowers on the card base. I then "brushed" the flowers with white craft ink to make them pop out.

The third card is a bit of a "cheat". It's a Cuttlebug embossing folder (one of the smaller ones). Yes I have a Cuttlebug and I LOVE it for embossing. It's fast and very effective! But I'm not going to take it to this class. Instead I'm going to show them how to use a ROLLING PIN and the embossing folder to dry emboss. It's very easy and cost effective! You just put your piece of paper (thinner copy paper works best) into the folder and then roll over it. You need to do this on something spongey like a mouse pad or a piece of fun foam. I then just brushed it with Very Vanilla craft ink to make the embossing pop out.
I have one more card to come up with by Thursday night's class (it's a 4 card class). It will have to be something masculine since I already have 2 flower cards!
I hope you like my cards and they inspire you to do some dry embossing!
No comments:
Post a Comment