Showing posts with label Design Team. Show all posts

Tuesday, June 16, 2009

Layin' Rubber Ink Design Clique #29

ETA: Just posted Tara's so I'm bumping this post up so everyone can see it!

This week we are working with this ballerina image from Rubber Baby Buggy Bumpers.

Here is Tara's:

Here's mine:

This is a 5x5 card and I used the Nestabilities Large Circle to cut out the image.

Here's some close-ups: I use my hobby blade and cut into the image so that I could pull some Tulle through!
Isn't this how ballerinas look when they are sitting down?


COPICS USED: E00, E01, E02 (skin), RV11 (leotard, shoes), T0 (shadow), T3 (hair), R01 (tutu)



Saturday, June 13, 2009

Layin' Rubber Ink Design Clique #28

I know this one is really late - let's just blame it on the end of school and all that entails!

This week's (actually it's last week's) image is the Angel from Stampin' Up! Anytime Greetings (retired).

Here's Tara's (she got hers done on time!):

And here's mine
(let's just say I'm into the "simple" look these days):


And here's a close-up of the sweet little angel.

And check out the DEEP CB Swiss Dot embossing!

COPICS USED: BG02, BG10 (background), E00, E01, E02 (skin), Y21, Y32 (hair)


Saturday, May 30, 2009

Layin' Rubber Ink Design Clique #27

This week we are using Local King Rubber Stamps' Hummingbird image from the Detail Birds stamp set.
Here is Tara's:

Here is mine:


This is a close up of the colouring - I'm getting better and staying in the lines!

I used the Clear Spica pen to add some shimmer!
I got this layout from Mojo Monday sketch 77!


COPICS USED: E27, E33, E97, G20, G24, YG13, YG17, B00, Clear Spica pen


Saturday, May 23, 2009

Layin' Rubber Ink Design Clique #26

This week we have the PSX Tulips image to work with.

Here is Tara's:

Here is my card:


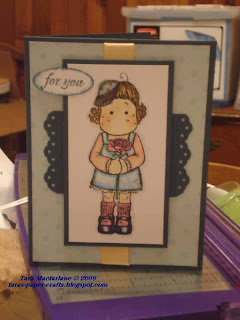
Can you tell I'm in a bit of "polka dot" and using the colour RED rut?

I seem to go to these 2 elements all the time now - I must get out of this "bad habit".

I know I'm not alone in this because I've seen so many others that are in their own ruts - whether it's sewing on every card, the same layout used over and over again, brayering on every card, etc...you know what I mean?

Here's a close up - I actually did colour in the tulips with COPIC G20 Wax Green. The inspiration for this card came from the tulips in my garden that are a kind of greenish white.

Saturday, May 16, 2009

Layin' Rubber Ink Design Clique #25

This week we are using Magnolia Stamp's Loving Tilda image.

Here is Alysabeth's:

Here is Tara's:

Here's mine:

The base of the card is white but I added a So Saffron layer and "quilted" it using the Scor-Pal. The ribbon is the same colour although it appears oranger in this photo (shows better in the other photos from a different angle).
I made her "dress" into a "coat" with paper piecing - I used the Basic Grey Boxer 6x6 paper pad (the reduced patterns work really well for cardmaking!).

You know I love my Sakura Gelly Glaze Clear pen and use it all the time! Look how shiny her red shoes look...but ignore the colouring outside the lines!

A close up of her face - I used my favourite flesh tone COPIC marker combo of E00 & E01. Her hair is YR21 & YR24.

This is another version of the same card but I used a Stampin' Up! 6x6 paper pack for her coat and W7 for her hair. W7 is great for black hair because it's light enough that you can see the stamped image but you can add more shading to darken it where you need it!

COPICS: R05, R24, R29, R59 (rose), T3 (for outlining), YG13, YG17 (rose stem and leaves), E00, E01 (skin) , YR21, YR24 (blonde hair), W7 (black hair)

Monday, May 11, 2009

Layin' Rubber Ink Design Clique #24

For this week's Design Clique we are using this Rose stamp from Local King Rubber Stamps.

Here is Tara's (I love how she used the scrap "frame" part from the Top Note Die!):
Here's mine:

The paper is vanilla for the card base and the gray polka dots are from a retired Charbon Designer Paper Series package.

I used the vanilla again for the Sizzix Top Note die cut (all from Stampin' Up!)

This greeting is from Stampin' Up! Fourteen Phrases - I love this set!
Here are some close-ups of the rose colouring:


COPICS Used: R24, R29, R30, R59 as well as T0 & T3 (for the rose), G40, G82, G85, G99 (for the leaves)


Friday, May 1, 2009

Layin' Rubber Ink Design Clique #23

This week we are all on time with our Design Clique submissions! YAY!!

We're using CC Designs Lucky Duck - monkey in the bathtub image.

The first one up is Tara:
Next is Alysabeth:

I think Alysabeth and I were drinking the same Koolaid this week because we choose similiar colour schemes!
Here's mine:

I was the last one to finish this week because I was having "issues".
I needed to come up with a greeting for this card and all I could think of was "Time to wash the monkey?" Seriously it was stuck in my head. I finally went to the CC Design website and chose one of the greetings from this set. Unfortunately I don't have the stamp set (the hostess sends out the images for the month to all the participants) so I just printed the greeting using MS WORD.
AND then I couldn't find a ribbon I liked to go with this October Afternoon Walk in the Park patterned paper
(it's actually the back side of it).
So I took out my handy dandy little COPIC reference book and found a colour that matched the paper and then I coloured the blue dots on this ribbon to better match my paper.
The coloured dots are to the right in the photo below and as you can see in my card above it matches very nicely
(better in real life).


So let this be a lesson to you if you've got COPIC markers you can easily make your ribbon match your cardstock just be colouring it!

COPICS USED: BG13, BG11, W), E31, E33, E35, ROO

Thursday, April 30, 2009

Layin' Rubber Ink Design Clique #22

I know I was supposed to post this last Saturday but I find I'm about a week behind in some areas of my life!

I'm hoping to get back on track and work on this week's project while watching the hockey game tonight.

What hockey game? The Vancouver Canucks' game of course!!! GO CANUCKS!!!

Anyway this week's projects use Pink Cat Studio's Lily Fairy image.

First one up is Alysabeth's http://www.layinrubberink.blogspot.com/

Next one is Tara's http://taras-paper-crafts.blogspot.com/And last as usual is mine:
I've always wanted to make a Diorama card and this week I decided to try one.
I used a Nestabilities die (Blossom) to cut out the opening and a retired Stampin' Up! wheel to decorate the green layers.
I haven't quite decided where to put the greeting so it looks a bit unfinished. I'll probaby hang a tag off the frame. I just have to find my "Have a fairy nice day" greeting!
Can you see that I sponged clouds in the background with white ink?
Here's a top view:
Yes I know I'll have to make a special envelope for this one!

A couple of close ups of the fairy colouring:


A close up of the frog colouring:

If you haven't already tried one of these Diorama cards and would like to know how to make one - just go to this tutorial.
COPICS USED:
E01, E00, R000, R00, RV00, RV13, Y08, Y21, Y32, B00, B41, E33, E55, G24, YG13, YG17

Tuesday, April 28, 2009

Design Clique #21 - Another Version

I used the same Elzybells Rainy Days image and did it up in a different colour scheme.