Showing posts with label Sizzix. Show all posts

Monday, May 2, 2011

Owl Together Now!

Owls have been popular in papercrafting for a while now. 

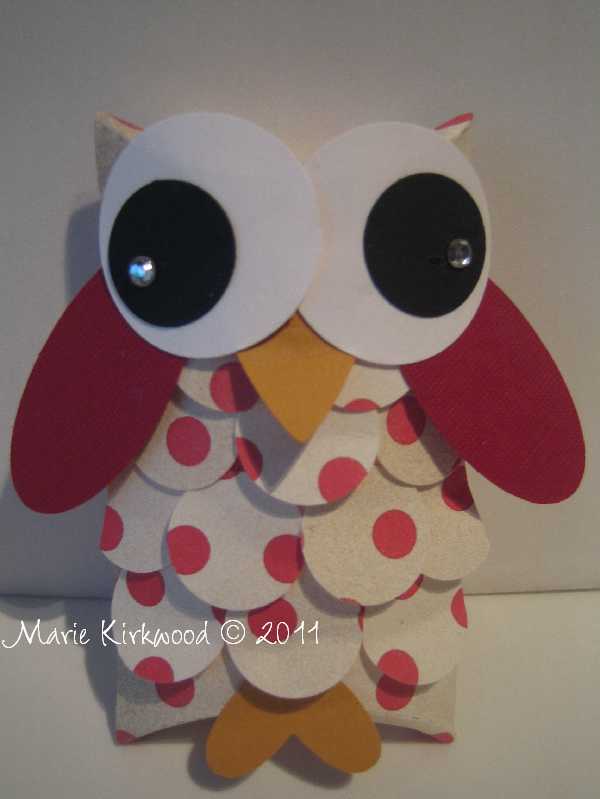
I know I personally own at least 2 owl stamp sets, an even an owl punch but now I've got 2 little owls to keep me company in my craft room!

Check these out:


These are made with the Sizzix Pillow Box die as the base and then punches for finishing touches.

Even though mine a little bit wonky I think they are really CUTE!!!

I saw them on Kerry's blog who found them on Pinterest where they were pinned from Gen's blog!

Until Next Time!
Marie

Sunday, April 17, 2011

Easter Egg Nest

Don't you just love this little nest I made? 


It's not my original idea but after I saw it I just had to make one!

It uses the Sizzix Scallop Circle die but if you don't have that you might be able to improvise with a large Spellbinders Nestibillity Scalloped Circle die.

If you would like to learn how to make one of these click HERE for the video from the super creative Brenda Quintana.


While making my nest I came up with these TIPS for you:
  • To make the "grass" I cut thin strips of scrap cardstock (4 inches long) with scissors and then rolled them around my index finger to curl.
  • When I glued the 1 3/4 inch circle to my scalloped circle I glued it to the bottom of the nest rather than on the top as Brenda shows in the video.
  • After I was finished making the nest I rolled the scalloped edge back so that it was a bit "fluted" rather than straight up.


Thursday, January 20, 2011

Cleaning up my craft room....

Sorry I haven't been on much lately - lots of running around with the kids!

I've got a boy playing/participating in 4 sports right now and a daughter who is learning to drive on her own (she got her N license in Sept).  We just picked up the cutest MINI COOPER!!! and we are all having fun driving it around (well at least 3 of us are).


Today I've been getting ready for my Heat Embossing class on Saturday AND a Scrap/Craft Garage Sale next weekend.  If you're in the North Vancouver area you should check it out - it's Sunday January 30th at ScrapArts.

So I've been moving stuff around and PURGING - seriously if I didn't even know I had it how come I'm hanging on to it?  YES I'm cleaning up my craft room AGAIN!

TIP: Did you know that you can use your Sizzix Silicone Mat (SU! #114615) to pick up excess glitter off your work surface, your floor, your chairs, your body!?


It works great for paper dust and regular dust too - I tell you some of this stuff has been sitting on my desk for a while!
Maybe you already knew that but I just discovered this and I think it's the greatest thing!!! 
Once you're done cleaning up just rinse off the mat with warm soapy water and let it dry.

TIP: I've reorganized my ribbon "collection" too.  I saw this idea on Sharon Harnist's blog and I thought to myself "I've got some of those and I'm going to do the same thing!".

So I did....

I even went a step further and took the dowels out of my Making Memories Embellishment Centres and put these Store In Style Ribbon Spool Stackers in instead.  Doesn't it look better?


 I went through all my ribbon and tried to "group" the ribbon by colours and theme. 
The ribbon stackers looked kind of plain (white on white) so I attached an embellishment to it -
this is a "faux" metal tag with a small green flower on the green ribbon stacker.
 You might notice that I've turned my embellishment jars on their sides too. 
I don't know why but the "newer" ones I bought at Michaels are just a bit too tall for my shelves.
I don't mind them this way - I can still see what's inside.
 I moved a bunch of things around and I'm very happy with how it turned out. 
Here I used one of my Stampin' Up! punches to make labels for some of my jars
Until Next Time...
Marie

Friday, December 31, 2010

Outside the Box with Nestabilities

Have you ever looked at cards and wondered how they cut out the image with a die but had parts sticking out?

This is not a new idea - it's been around for a while with manual cutting/trimming around an image. 

Here's an example of an old one I did using my trimmer and scissors. Notice how the chef's hat, tray and feet are all outside of square white background.

This technique is called "outside of the box" but how do they do this with the nice scalloped and oval dies?

Recently I saw a video tutorial from Margaret on how to do this with Nestability dies.

Click HERE to check it out.

I wonder if there is some easy way to do this with other dies - like Sizzix?  I have done it before but it's not a 1 step cut process like Margaret's above.

If you want to see how I did "outside the box" with a Sizzix die - click HERE.


Saturday, October 2, 2010

Saturday & Sunday Shop: New Tim Holtz Strip Die

I just got the coolest die designed by Tim Holtz for Sizzix.

It's the Paper Rosette Flower strip!


*Tim Holtz Sizzix Die PAPER ROSETTE Flower Strip Alterations IN STOCK NOW!
This is a decorative strip die that cuts one long accordian perforated strip piece and a centre circle piece (you actually need 2 of these so fold your circle paper for 2 when you feed it through your die cutting machine).

Here's a quick one I made up:


I did this in one pass through my Big Shot.  I used a long strip of yellow cardstock and a piece of black that I folded over for the centre.  I positioned both pieces over the cutting blades and then fed it through my Big Shot.

After I assembled it I sponged the folded parts and edges of the flower with black ink.

Isn't this the coolest thing!

Click HERE to see Tim himself in a video showing off this fairly new die!

Now Tim doesn't mention cutting 2 pieces - he actually punches out a circle base separately - but it is on the instructions for the die and I find that cutting 2 circle seal pieces is really easy (one for the front and one for the back) and gives the flower more versatility for 3D projects!

I first saw this die on someone else's blog (can't remember who now) and asked Shelley over at ScrapArts to order it in for me.

She did and she even ordered a few extra for the store. 

So if you're in North Vancouver and you want one of these you better hurry in to ScrapArts because they won't last long!

Better yet call them at 604-980-8811


Sunday, November 15, 2009

Folded Embossing Folders Technique

One of the swaps in my Quick Christmas Swap (done by Ann Wood) uses the Crimped Over the Top Technique (see tutorial HERE).
I really like the look of this and decided to experiment a bit using this technique and a Cuttlebug Folder.
Ok the truth is I could not find my crimper so I tried this out instead.

I haven't seen this done anywhere else - am I the first?
This is what I came up with using the Cuttlebug Forest Branches embossing folder.
It's very easy - just fold your base piece anyway you like and then put it in the embossing folder. Run it through your Big Shot and use it as your base mat layer.

There are so many techniques - tried and true - that have been around for ages. With the progress in papercraft supplies/tools it makes me wonder what other techniques can be tweaked and modified a bit to come up with NEW techniques?


Thursday, May 7, 2009

Playing with Sizzix Die Cuts

I'm experimenting as I prepare for an upcoming Big Shot - Next Step class.

This is for people that have their own Big Shot and want to learn more than the basic die cutting and embossing.

I thought it might be nice to throw in a few of the Sizzlit paper piecing dies to show how to "finish" them off. I think that some people might buy these dies and don't use them or avoid them all together because they never look as nice as the example on the packaging.

I'd like to show you in today's post how I've finished off mine.

Here is the Sizzlit Girl in Ballerina Costume:


Isn't she cute?

On the left she's just cut out of plain white paper. You could do this and colour her in with your markers - working with just 1 layer.

OR you could run her through your Big Shot a few more times with different coloured cardstock and piece her together like I've done on the right.

I first cut her out completely in Blush Blossom cardstock and then cut her tutu out of pink and her hair out of black. I didn't use a big piece of pink - just a piece big enough to cover her entire tutu area. Same for the hair - just a small piece of black was all I needed.

This is a great way to use up all those carstock scraps you've been saving!!

I pieced all the parts together using the Sakura Quickie Glue pen. I added some shadowing with a pink & blush marker and some highlights with the white gel pen.

Here's a close-up:


Again I cut him out of white plain paper first to show you how it looks as a single layer.
I followed the same process as for the Ballerina. The base is Blush Blossom and then I cut coloured pieces and added them to the base. The t-shirt, shorts, skateboard and helmet were all cut using small scraps of paper.
While I was working on these my 13 year old son walked into the room. Once he saw what I was doing he wanted to give it a try.
Mine is on the left and my son's skater is on the right. I think he did a fantastic job!
A close up of mine:

I used coordinated markers to shade and a white gel pen to highlight. I like to use the Sakura Clear Gelly Glaze pen to add gloss (helmet) and the Black Gelly Glaze pen to add glossy black accents (eyes, pads, shoes & wheels).

Here's my son's Skater Boy:

I'm not sure I'll use these particular dies in the class - it's hard to work with these in a sharing class situation. I only have 1 die and you need to run it through multiple times to cut each coloured piece. That would take up too much class time!
I'll bring them along for "Show and Tell" and explain the process for sure!
This next die was a quick one to cut. Here is the Sizzix Medium Bunny die:

This one was definately easier than the previous Sizzlits dies!
It actually doesn't look too bad cut out of solid pink but I think it looks better with added shading and highlights.
I hope you've enjoyed this post - I had fun making them!