Showing posts with label Glitter. Show all posts

Thursday, April 16, 2009

Glitter & Gloss Thank You Card Class Samples

These are the samples for my Glitter & Gloss Thank You Card Class.

This first card uses Crystal Effects resist. I'll be doing this one right off the bat so it will have time to dry and then we can sponge on ink afterwards!


I have to admit that this colour combo is out of my comfort zone but it's beginning to grow on me. I usually do this card with pinks and greens but decided to try Certainly Celery, Chocolate Chip, Blush Blossom & Regal Rose.

I really like this tryptic layout because it's so versatile in that you can use different sources for your focal piece. You can randomly stamp an individual piece of white paper or cut up pieces of a one OSW (One Sheet Wonder) either stamped or printed patterned paper.

I coloured in the blooms (stamped in Chocolate Chip) with Blush Blossom and Regal Rose markers and then added the crystal effects (aka Glassy Glaze or Chrystal Lacquer) afterwards. When it was dry I sponged on Certainly Celery shadows.

The next card uses the Cracked Glass technique. The technique is basically layers of clear embossing powder until it's so thick that when you bend it - it cracks! I used 3 layers of UTEE (Ultra Thick Embossing Enamel) and I didn't put it in the freezer as I've done in the past but allowed the pieces to cool on their own and then cracked them.

I had a vision for this card in my head and originally planned to use a different stamp but it didn't work out. It really had me blocked (does that ever happen to you?). I decided to pop into Scrapbook Warehouse in Vancouver (Hi Tayce!) for some inspiration. I found this Hero Arts stamp and it was just the inspiration I needed to make this card.

I also use the Sizzix Top Note Die (from SU!) and the Herringbone embossing folder (from Cuttlebug). The cardstock is Very Vanilla (it deepens when you put this much UTEE on it!), Black and Kraft.

I randomly cut the image out on this sample but I did use the Top Note die to cut the vanilla piece. So I'll let the customers decide if they want to keep it in that shape (just trimming to the stitching) or cut it like mine before they emboss it.

This next card uses glitter, clear glaze jelly pen & black glaze jelly pen (both from Sakura) as well as my home made cloud template.

I stamped the dragonfly first and then coloured it with Lovely Lavender and Pretty in Pink. I then sponged on the clouds using Bashful Blue in and my homemade cloud template (made from milk jug plastic!). I added the Dazzling Diamonds glitter with the Sakura Quickie Glue Pen and applied the clear glaze to the body and black glaze to the eyes.

The "grass" is just a 2 inch strip of Old Olive with a ribbon attached for interest. I used my paper snips to cut down to the ribbon and make blades of grass.
The next (and last) card uses Irridescent Ice Embossing Powder with a tone on tone look.

I saw this card on a blog (sorry I can't remember where but if it's yours please leave me a comment and I'll give you credit!). I found 2 different stamps that I like and the design works with it so I'll offer the choice to my customers.
To make this card stamp first with the same colour ink as the cardstock (Cool Caribbean in this case) and then use your Emboss Buddy (anti-static pillow) to ensure your glitter embossing powder only goes where it should! Then stamp with Versamark Ink and then apply the Irredescent Ice embossing powder.

The last step was to add a greeting - I couldn't decide between the two so I used 2 different ones.


These are not stamps but greetings typed up in MS Word and then printed (see photo of greeting close up below). I added a little bling and it was done! Very quick, easy but elegant!


The Glitter & Gloss Thank You Card Class will be held at Scrap Arts (in North Vancouver) on Sunday May 29th 2-4 pm.

If you're in the area and interested in making these cards please call the store to reserve your space - 604-980-8811.

Thursday, January 8, 2009

Embossing Paste Tutorial finished card

Here is the card that I made from the Embossing Paste Tutorial I showed you HERE.
This close up shows the glitter snow I added (using glue and a tip) to the embossing paste trees.

The "snow" falling in the background is just the White Signo Gel Pen.

Monday, December 22, 2008

Embossing Paste Tutorial

Do you have any of these dry embossing stencils around?


Well if so you should really try them with Embossing Paste!

I recently attended a craft fair here in Vancouver and saw this demonstrated - the result is similiar to heat embossing but it's "cooler". You don't use the Heat Tool!

You'll need the following: A stencil, embossing paste (I'm using the Pearlescent from Spellbinders), a pallette knife and some masking tape.
Tape your stencil down on a piece of cardstock. When taping - tape the top and bottom first and then do the sides (this is important for removing/checking later).

Apply the paste using the pallette knife in a diagonal direction.

Once you think that you have covered the entire area, remove your side and bottom pieces of tape. Use your top layer of tape as a "hinge" to check your results.If you are satisfied (I am) remove the tape and stencil. If not, lay the stencil down again and reapply the paste to the areas you're not happy with.The paste does stick to the stencil but it can be removed with some warm soapy water.

BE CAREFUL NOT TO BEND YOUR STENCIL WHILE CLEANING!!I'm going to let my trees dry and then I'll apply glitter and use the piece on a card. I'll post the card tomorrow or when I get it done!

In the meantime here are some photos of a piece I embossed using the Stocking stencil, white embossing paste and Art Institute glue (with a tip) to apply micro fine glitter.

It's very sparkly!

What do you think?

Saturday, July 19, 2008

Which Glitter? Which Glue?


I have so much glitter in the house - seriously you'd think that fairies and pixies lived here!!

I thought I'd put together a bit of an information post for glitter to help others that might be venturing into the wonderful world of glitter! OR even those that have tried it in the past but have forgotten how great it is!

First of all - I don't have to tell you that glitter can be MESSY! But it doesn't have to be too messy if you prepare a bit before. Regardless of what you do - you will end up with some glitter on yourself and will look like a "disco queen wannabe" by the time you're done!
It happens to everyone - someone once said that glitter is like the herpes of the craft world!

I like to work on a self healing mat so that I can clean up easily. I also like to use a piece of scrap paper (folded in 1/2) to catch the excess glitter. If you are working with multiple colours/types then you should have a separate piece of scrap paper for each one so you don't cross-contaminate your glitter.

For clean up there is the Glitter Clean Up Cloth - which is great for "picking up" glitter.

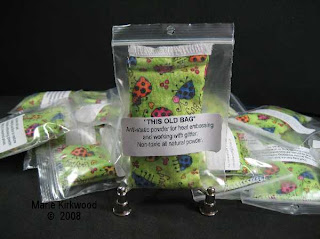
To help keep yourself and your project static free I like to use a anti-static pillow like "This OLD BAG" which I sell at Scrap Arts or through me directly (just email me). It's great for working with glitter and embossing powders.
The type of glitter you select for a project really depends on what you want to achieve.

Textures:
Microfine - micro particles of glitter perfect for creating the Burnished Velvet look
Ultrafine - fine glitter smaller in size than regular craft glitter but more brilliant than the Microfine
Chunky/Craft - Chunky glitter is a larger cut for more brilliance but a bit harder to adhere

Effects:
Opaque - this glitter will cover whatever color it is applied on/over
Transparent - this glitter is see-through and it's outcome is affected by the color beneath it
Transference - this glitter will have an underlying colour and when applied on certain colours will show through - example - Warm/Cool/Green Highlight glitter
Perlescent - this glitter can be both opaque and transparent but it has a "satiny" pearl like finish. "PearlEx Micro" for example can easily be mixed with glues and sprayed on using hairspray for a subtle effect.

Glitter comes in all kinds of containers too. For the most part I keep my glitter in it's original container but if you find that you are using more of one particular colour - like red at Christmas or white/highlight glitters for snow - then you may want to transfer them to bigger containers with snap lids for ease of use.

Application:
There are lots of adhesives available that make applying glitter easy. You just need to find the right one for your project and the look you want to achieve.

Sakura Quickie Glue Pen - This is one of my favorite ways to apply glitter - it's both quick and easy! You can highlight a small section of a stamped image or patterned paper by drawing where you want the glitter to go. Apply liberal amounts of glitter over the glue and tap to remove excess. It goes on blue so you know where you've applied it and it dries clear. ($4.99)

Tsukinkeo Essential Glue Pad - When working with stamps this is the quickest & easiest way to apply adhesive. It works just like an ink pad. "Ink" up your stamp with this adhesive and stamp onto your surface. Or you can apply the glue pad directly to your project or chipboard piece. Apply glitter. This type of adhesive is an easy option when working with solid image rubber stamps and a lot less messy than liquid glues when working with chipboard. The only downside to this glue pad is that the pad comes uninked (a reinker bottle is included) and you might have to re-ink it before using each time ($10 - $15).

Liquid Glues - There is a lot of different types of liquid glues available and you probably have some in your house. BUT I have to WARN you that not all liquid glues are the same. Some have higher water content than others which can cause your paper project to buckle and warp.
The 2 liquid glues that I like to recommend are:
  • The Art Institute - This liquid glue is made by the Art Institute (in Arizona) and is designed specifically for use with glitter. Read the labels carefully as some of this brand of glue dries Clear and some dries White - both have their benefits when used properly. On the downside this glue is hard to find and somewhat pricey ($15.95 for 4 oz of Dries Clear glue).
  • SOBO - Made by Delta and available at most craft stores. This liquid glue dries clear and does not warp paper. It's very reasonably priced as well ($3.99 for 2 oz or $14.99 for 16 oz)

Fabric Dimensional Paint - this is a fun way to apply glitter when you want it to have some dimension!! It may take a bit of practice and it's almost like cake decorating but you can make some beautiful results using this. I prefer to use the white or the transparent clear rather than colours. Although using the coloured fabric dimensional paint is awesome when working with the "highlighted" Transference glitter. It's a fun surprise to see what colour you end up with! (Tulip Matte Dimenisoal Fabric Paint $4.97 for 4 oz).

Double-sided Adhesive Tape/Sheets - Double sided adhesive tape/sheets are available from many different manufacturers and are great for adhering glitter over a variety of surfaces. This product can be free hand cut with an exacto, die-cut or punched to create fun shapes that can be applied to your project and then covered with glitter. You can even cover a stamped or patterned piece with an entire piece of the adhesive tape and apply the glitter on top for an overall effect. I've used the Sookwang tape and highly recommend it. It is available in many different widths and is very sticky - perfect for glitter.

Other Suggestions:
- Use regular acrylic paint! Most of us have some of this stuff lying around... Just apply a liberal coat to your project and then quickly add your glitter before it dries.
-Glue dots - any size will do! Just apply in a row or pattern and then add glitter. It's a quick and easy way to add a bit of punch to your project!

Right now I'm in LOVE with Glitter Ritz glitter Grasshopper and Garnet in the Micro Fine!

I'm considering using both of these on my Christmas cards this year!

Sunday, July 13, 2008

Glitter Class with the "Glitter Queen"


This afternoon I had the pleasure of attending a Glitter Technique class at Scrap Arts in North Vancouver with the infamous Glitter Queen herself - Deanna Pannell.

She started off by explaining to the class the glues available and her preferences and the uses of dries white vs dries clear and then the benefits of each one. I learned a TON!!!

She also shared with us her tips and tricks for working with each glue and Ultra Glitter in a plethora of colours. Some of her samples were stamped with Brilliance Ink and others were heat embossed in white and metallic embossing powder.

She demonstrated her "teardrop" technique using this tree stamp that she designed
and led us through a "doodling" exercise to come up with our 60 second tree (or was that 10 second tree?) Here are my "doodles" and my glittered practice trees.


See how thick the glue is on this tree? Needless to say it takes a bit of time to dry!


I can't wait to put these techniques into practice when I hold my Christmas Stamp Camp in the fall!