Showing posts with label Stamps. Show all posts

Wednesday, April 25, 2012

More Photos for Stamp Organization

Sheri left a comment asking to see my bins.

So I thought I'd post more photos with less writing....

I use these Martha Stewart CD bins (discontinued) to store my unmounted Stampin' Up! stamps:


I've labelled them (yes I will be redoing the labels) and numbered them - the number corresponds to pages in my stamp binder.

Each bin holds 30 CD cases.

I print off 1 page of stamp images for my stamp binder and
another I fold lengthwise and put in the stamp bin.
If the stamp set in the CD case is missing an image sheet then I print off an enlarged copy of the image and include that in the CD case.  Most of my stamps are older and were missing image sheets!
For my non-Stampin' Up! stamps that are still wood mounted I use a different system.
I keep them in Stampin' Up! snap cases (recycled from my unmounted stamps!)

I labelled them by theme and added a code letter.
I pack the case tightly with stamps!

Keeping the lid on I place the stamp case on my scanner/printer/copier and copy it 2 times.
1 copy is trimmed and included in the case so I know what stamps are in there but  more importantly what stamps need to go back in this case!
The second copy is hole punched, labelled with the case code letter and inserted into my stamp inventory binder.

It's so easy!!

As for my clear polymer and rubber cling mount stamps I use a combo binder & bin system. 
I'll share more of that another day when I finish the inventory!


OMG! I finally have a Stamp Inventory Catalogue!

I've been accumulating Stampin' Up! stamps for over 8 years.  I quickly ran out of space for all those cases of wood mounted stamps so I started unmounting my stamps and wheels!

Click HERE to see that post.

I now have 11 bins (that hold 32 CD cases each) of Stampin' Up! rubber stamps (mostly retired).

Plus a TON more loose non-Stampin' Up! stamps.

Sadly I wasn't using my stamps because I had no way of knowing what I had in the bins and I didn't keep the image sticker if it was already stuck on the wood block.

So after reading Kate's amazing craft room cleanse journey I decided to tackle these stamps and get myself more organized.

First I sorted ALL my stamps by theme.  Then I created an inventory sheet (in MS Word) for each bin and printed off a duplicate to keep in my new stamp binder.

To create the inventory sheet I scanned the label sheet for the stamp set (for ones I never mounted them on wood blocks) .  If I don't have labels I look for the images on the internet and insert that image (if I'm lucky an image of label sheets) into my document.

If my CD case is missing the image sheet (because it was a mounted stamp set and I threw out the labels stuck on the wood blocks) I print off a larger image or as true to size as possible and put that in the CD case with the stamps.

Here's what my Stampin' Up! stamp inventory page looks like:


Nothing fancy but it gives me an idea of what I've got and where it is!

For my non Stampin' Up! wood mounted stamps I created similiar inventory pages (in the same binder).  I sorted the stamps and put them in snap cases by themes.  I used my labeller to label the theme and then a code on the side of each case. 

I used my printer/copier to copy the top of the case (without taking the stamps out) and I printed out 2 copies.  One for my binder and the other I trimmed and inserted in the stamp case.  This gives me a quick "snapshot" of what's in the case and what should go back in that case.

I can flip through this binder and get a good idea of what I've got and hopefully find what I'm looking for.

Next I'm going to tackle my clear and rubber cling mount stamps!  I just need to inventory them - I've already sorted them and put them in bins (SU!) and binders (non-SU!).

Until Next Time!
Marie

Tuesday, December 6, 2011

TIP: Converting stamps to clear mount

If you are like me and have been at this hobby - stamping - for a while now you will probably be running out of room for all your stamps.

Years ago I started unmounting my wood mount stamps and rollograph wheels and now I mostly buy unmounted or even digi stamps. 

But I have a ton of stamps still on wood that I really must do something with.

Today I came across this blog post in my favourites and I thought I would share it with all of you.  In case you haven't seen it that is!

I really like this post because it's simple to do for stamps that you haven't mounted yet -use the stamp image stickers and tombo mono glue to "convert" the wood mount stamps into clear/cling mount ones. 

BUT I also love her TIP of peeling off an old sticker from the wood block and using that again on your rubber.  I hadn't thought about that and I did throw out a bunch of them in my frenzy to unmount!

Until Next Time!
Marie

Tuesday, April 19, 2011

New Loot!

Yesterday I was in Scrap Arts -  my favourite LSS (Local Scrapbooking Store) - and I picked up all of these goodies!

The embossing folders are new from Craft Concepts.  It's an Australian company and they make limited run embossing folders.


I tried them out this morning and they emboss beautifully.  Nice deep and clean embossing!


The stamps are from Autumn Leaves.


Shelley's got a good selection of both right now but they won't last long! 

If you're on the North Shore and in the area you should check it out! 

Scrap Arts is located at 175 East 3rd St in North Vancouver or call the store today for your scrapbooking needs 604-880-8811.

Thanks for stopping in today!

Why don't you check back with me tomorrow and see what I'm up to?  I've got a surprise coming up.....

Ok so I'm not very good at keeping secrets - I'll just tell you that I've got some BLOG CANDY coming up!!

Thursday, October 28, 2010

Thursday Technique - Multi Coloured Images with Marker

"Marie how do you get the different colours on your line stamp images?"

I get asked this question all the time.

Maybe you've wondered about this too?

This is one "mystery" that's very easy to solve.

Rather than re-invent the wheel I'm just going to send you to a quick video tutorial by Mary Fish.

Click HERE to see it.


Friday, August 20, 2010

New Rubbah!

OMG!  I think I have posted every day this week!  We'll see how long I can keep this up...

I just had to tell you that my Gorjuss Girls stamps arrived in the mail yesterday all the way from the UK!

I can't wait to colour these!

Saturday, July 24, 2010

For Priscilla....

Today I took a class with Elizabeth at Scrap Arts (see THIS POST for the cards I made). 

In the class one of the other customers (Priscilla) asked me how I organize my greeting stamps. 

The sad truth is that I do not.  I've tried and the best I can do is put all my greetings together by theme (for wood mounted singles or clear acrylics) or for unmounted rubber in a Greetings storage box.

But she asked specifically about how to keep track of the greetings that come with Stampin' Up! mixed sets? 

How do YOU keep track of those and remember what you have?

Well at the time I didn't have an answer but on the drive home - yes in the quiet of my car I like to brainstorm - I remembered THIS POST that I did for Crafty Storage.

It's a bit time consuming but once it's done what an awesome resource it would be!

So Priscilla if you're reading this please check out what Gretchen did and maybe that will inspire you to do the same.

Saturday, March 20, 2010

Unmounting Stamps - My Story

Several times a week I see a request from someone who is interested in unmounting their stamps.
I've been a Stampin' Up! Demonstrator since 2004 and started unmounting almost 4 years ago.
At the time it was not really acceptable to do this but now that Stampin' Up! is offering a clear mount alternative to the traditional wood mount option it has a lot of people wondering if this is the route they should go.
I really think that this is a personal decision. For me it was easy - I ran out of room!
There are many reasons to unmount but the 2 most important ones to me are 1. Storage - too many stamps too little space and 2. better image positioning.
As for unmounting there are so many ways to do it and I have pretty much tried them all!

One thing to keep in mind BEFORE you start - be sure you really want to do this! Because once you unmount your stamps they are not as valuable (resale) as they are on wood blocks. If you're a "working" demo I'm not sure what the rules are but since SU! has gone to unmounted I'm assuming that you can use unmounted all the way in your workshops. Maybe your upline can tell you if that's ok or if you have to use the stamps in the format that they come in (ie/ wood block only sets demo'ed on wood).
For this reason I keep my current stampin' around wheels on the original rollers (yes I unmount my wheels too -keep reading).

So if you are sure that are ready to unmount and these are the stamps that you are going to KEEP then go ahead. But if you're unsure about some sets (maybe you don't LOVE them like your others) you might want to wait on unmounting those and consider using them on wood blocks or eventually sell them.
Here is my LOOOOOONG story of unmounting stamps!

I started off by taking the rubber off the wood blocks - some people like to heat the stamp in the microwave for 10-15 seconds and then peel the rubber and foam off. I did this a few times but really the blocks are left with a bit of sticky on them and not useable. It also made my fingertips very sticky doing it this way.

So I jumped ahead to just peeling the rubber off the wood blocks (no heating) and leaving the foam on the block. If the rubber didn't come off with my fingernail I used an exacto knife to get it to start separating from the foam and then my fingers to peel it off the rest of the way.


That left me with lots of rubber to do something with.

So the first thing I tried was ez-mount and trimming with a hot knife. That was getting expensive because I had soooo many stamps to do and it took a long time. You had to make a jigsaw puzzle on the ez-mount with your stamps and then cut them out (not to mention the smell of burning foam!) and then try to figure out which sets the stamps went with! Oh BOY!

During this time I was also using cling film for my new stamps - ones that had not yet been mounted on the wood blocks. I'd just take the paper liner off the foam and then stick them on the cling. The cling film sheets weren't that expensive but to get more for your money you can buy the clear vinyl tablecloth (from Walmart in the fabric dept sold on the rolls). BUT again MORE cutting/trimming and sorting. This was also so time consuming!

Then I discovered Aleene's Tack It Over and Over (from Michaels) and I've been using that ever since. You just paint this glue on the back of the red rubber, leave it to dry, de-tack it a bit and then voila it's ready to use! You can do a ton of stamps in one sitting and even keep them in the case so there is no desparate re-sorting at the end of this process!

Someone posted on one of my groups that you can actually add Aleene's to the back of the paper liner on NEW stamps (before they're mounted) and that seemed to work but I've never tried it.

With unmounting to just rubber there was some concern about not having the foam for cushion and that the images wouldn't stamp very well. Well I got around that by stamping on a sheet of fun foam and it does the trick. The images do come out as nice as on the wood blocks - sometimes even better!
After the initial flurry of unmounting most of my stamps I decided to tackle my wheels.


You just cut the seam on the wheel rubber and peel it away from the plastic spool. There is no foam to deal with - just rubber strips! I write the name of the wheel in Sharpie on the back of the rubber. I store my wheels in one single storage box.
I had custom clear blocks made at a local glass shop for both the regular and jumbo wheels. I do not put Aleen's Tack It on these because they would then stick together in the box. Instead I used the double sided clear tape on the block and stick the rubber to the block when I need to use it.

The only stamps that I haven't unmounted are my alphas and background stamps. The alphas because they would be so much work and lots of little bits of rubber to contain and the backgrounds because they are easy enough to store on a bookshelf with a side label.
I have to confess that lately I haven't had time to do a major Aleen's Tack It session with my stamps (ok maybe I've accumulated more that I care to admit since the last time) and I've been getting by with putting double sided clear tape on my blocks and then pressing the rubber stamp onto it. It is temporary and it does work quite well!

Along with all this unmounting you have to consider a cataloging system - I wish that I continued stamping image inserts as I unmounted my stamps. But I got lazy/distracted/interrupted and stopped doing this after the first 50 or so!This would have made a great reference book for finding the stamps. I did try several times to come up with catalogs for my stamps but there are so many now and the task is too daunting for me right now!


For new stamps I'm tucking the sticker sheet into the CD case with the rubber.

I keep all of my stamps (mostly Stampin' Up!) in their original sets in empty CD cases in linen storage boxes (Martha Stewart from Michaels). Each box holds about 30 CD cases.


For comparison sake I want to show you these 2 photos. The first photo shows one shelf of approx 30 stamp sets (in their original cases) and the next photo shows approx 30 stamp sets stored in one CD storage box. 3 of these storage boxes fit on a shelf! So I'm working with them in categories in these storage boxes.
This is an old photo and now I have 9 boxes filled with Stampin' Up! stamps and another 5 filled with other company stamps!

I organize the boxes this way for Stampin' Up!

CURRENT - by alpha

RETIRED - alpha by themes

For non Stampin' Up! stamps I have separate boxes for each company and then I store them by theme.


The only drawback - again from a lack of catalog - is that I have to know what I'm looking for and then I look for it. I can't just browse at the images (in my non-existent catalog) and go for something that I might have forgotten that I have.

So I usually end up using the same stamps over and over again. Do you know what I mean?

Well if you've read this entire post I wan to thank you for sticking with me. I hope you found it informative and that it has helped you to make your unmounting decision!

If you want MORE information click on THIS LINK and it will take you to a list of all the unmounting posts here on my blog and you can see all the photos and instructions for what I've done.



Tuesday, January 26, 2010

Using Stampin' Up! Older Stamps as Cling

Check out THIS BLOG POST by Jen Arkfeld at Stamped Silly.

She shows you how she has "converted" her non-cling wood-mount Stampin' Up! stamps (not yet mounted) into cling stamps using the sticker sheet and Tombo Mono adhesive.

It's sooooo cool!
U


Tuesday, January 19, 2010

Unmounting your wood mounted rubber stamps!

Now that Stampin' Up! has come out with the cling mount option for woodless stamping everyone is jumping on the unmounting band wagon!

Not only does it save space (for us "stamp collectors") but it is also much easier to line up the stamps when stamping.

I ran out of room a long time ago and starting unmounting everything - including my wheels!

Click HERE to see all my UNMOUNTING posts.


Thursday, February 19, 2009

New stamps at Local King!

Have you seen the new stamps from Local King?

They are awesome and I just had to have a few of these sets to add to my stamp collection!

Check out their NEW STAMPS by clicking HERE and take advantage of the February SPECIAL (buy 3 get 1 free)!!

I popped in to visit with Lisa toady and we played with some Nestabilities in her Cuttlebug and I got to see her samples for her upcoming shows and classes.

It was hard to pick out just a few but in the end I bought:

Wild Wild West
Mustangs
Cupcakes
Poppy
Silence

Friday, October 10, 2008

My Stamp Image Catalogue

Can you believe that I'm still working on unmounting my rubber stamps and cataloging them so that I can find what I'm looking for when I need it! AND also to stop repeat purchases!!

I decided that I would print out the stamp set name (for Stampin' Up! stamps) or the theme on 1/2 sheets of paper. I went ahead and made up a WORD document and printed out over 300 pages. I then cut those into 1/2 and ended up with a nice 6 inch stack of 5 1/2 x 8 1/2 pages with no where to put them!

I was hoping to find a binder that would fit that size with room to grow - I was just starting this process!

I did find some binders for the 1/2 page size at Staples but they were only 1 inch wide binders and I needed something much bigger.

I looked all over and couldn't find anything that was premade (unless I went to full pages) so I had to improvise.

I found some cheap scrapbooks for 5 x 7 pages (with plain coloured covers) that I thought I could work with BUT they came with the traditional posts that all scrapbooks do that are only meant to hold 10 pages.

So I went to the Home Depot and looked around for different binding options.

I found:

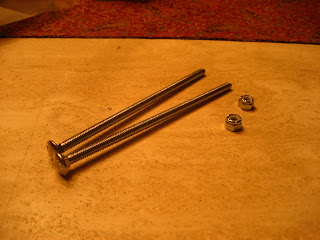
Solution #1: flat head carriage bolts that are 6 inches long (59 cents CAD each) and lock tight nuts (23 cents CAD each) to go on them. These will work perfectly except that I'm not ready to put my entire catalogue together yet - I still need to finish stamping images on a LOT of pages.


Solution #2: Chicago Bolts which in fact are exactly like the posts that come in the albums!! They come in 2 inch lengths and there are 1 inch extenders available as well!! They're pretty cheap too - 4 x 2 inch bolts in a pkg for $2.49 CAD and the extenders are 4 in a package for $2.29 CAD.


Here's a photo of one album that has completed images. I have another that I have to stamp images for but eventually I'll be able to put them together into one book now that I've solved my binding dilema!

The best thing about this binding system is that I can put the album up on end and flip through the pages to find what I need or just lood for inspiration.

I still have to stamp images for another 3 inches of pages, umount MORE non-Stampin' Up! stamps and catalogue them, and then make up some kind of cross reference system so that I'll know which stamps are in what boxes.

But I'm making progres...

Monday, September 15, 2008

Stampkeeping time...

Today I did a bit of stamp housekeeping or "stampkeeping" as I like to call it!

I needed to go through my Stampin' Up! stamps and identify the recent retired sets. While doing this I decided to re-do my retired identification method. I used to just pop a red dot sticker on the CD case to identify the retired sets. BUT the darn things kept coming off!!

So today I went into my scrap bin and pulled out strips of red cardstock and cut them into bits. I just used my ATG to run a strip of adhesive along it and stuck them behind the stamp set name labels.

Now they're easy to identify and actually easier to read!

I also tackled my acrylic stamp collection.

I've struggled with this for a while - I used to keep all these stamps in a drawer but that wasn't working for me! Dee shared her idea for storing the stamps in page protectors so I found some heavy duty ones (at Staples while back to school shopping) and filled a HUGE binder with them.

Sorry about the photo - the glare is awful and even with the red cardstock behind the page it's hard to see! But you get the idea...


For my smaller $1.50 Michaels stamps (and other smaller acrylic stamps) I used Trading Card Pages that I found at Staples (made by Avery).


Now I still have to sort them out and come out with a catalogue system but this is a start and now they are clearly visible and all in one place!

How do you store your acrylics?

Tuesday, September 2, 2008

Another Santa Head Stamp!

I love the old fashioned looking Santa face!

I have a Gunson Santa Stamp from Scrap Shack that I used on this card:


and I just picked up this one


I can't wait to get my COPICS out to colour him in!