Showing posts with label Tips. Show all posts

Friday, October 26, 2012

TIP: Re-inking the new SU! Ink Pads

Friday, Octobr 25, 2012

Denise just left me a comment on another post about re-inking the new Stampin' Up! ink pads.

I have to admit that I haven't had to re-ink any of mine yet but I just assumed that you re-ink the new foam pads the same way you re-ink versamark pads - use the tip of the bottle to push the ink around the pad.

That's what I would have done but wait there's a BETTER WAY....

I found a great tip (from Stampin' Up!) on how to do it much easier!!

1.  Add a few lines of re-inker to your stamp pad - be careful not to over ink the pad! 

2.  Then take a bone folder and run it over the pad, back and forth to work the ink into the pad.  Be sure to wipe off the bone folder with a baby wipe or wash it immediately afterwards or it might transfer to paper when you are using it to crease folds.

Note: If you find your images splotchy after re-inking blot off the excess ink from the pad with a paper towel.


Note: The new foam ink pads will have to be re-inked more often than the old ink pads so when you order a new foam ink pad get the ink refill at the same time!
Until next time...
 

Sunday, September 16, 2012

TIP - Cutting out embellishments and stamped images

September 16, 2012

I usually pre cut a lot of my class "parts" but sometimes with certain techniques I need the class participant to cut things out during the course of the class.

For some this is a struggle - whether it be eyesight, left hand vs right hand, or just not great at cutting.

Now if you've ever been in a class of mine over the years you might have heard me say - move the paper not the scissors - when cutting out paper pieces.

It does take a bit a practice and sometimes it's helpful to see a visual on how to do this.

Dawn McVey has put together a YouTube video that explains and demonstrates how to cut things out moving the paper rather than the scissors.

It's really simple but if you're having trouble with this HERE is a great visual for you.

Wednesday, April 25, 2012

More Photos for Stamp Organization

Sheri left a comment asking to see my bins.

So I thought I'd post more photos with less writing....

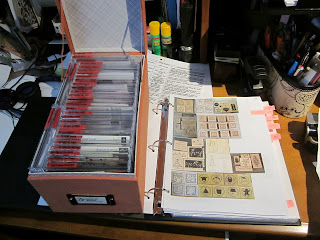
I use these Martha Stewart CD bins (discontinued) to store my unmounted Stampin' Up! stamps:


I've labelled them (yes I will be redoing the labels) and numbered them - the number corresponds to pages in my stamp binder.

Each bin holds 30 CD cases.

I print off 1 page of stamp images for my stamp binder and
another I fold lengthwise and put in the stamp bin.
If the stamp set in the CD case is missing an image sheet then I print off an enlarged copy of the image and include that in the CD case.  Most of my stamps are older and were missing image sheets!
For my non-Stampin' Up! stamps that are still wood mounted I use a different system.
I keep them in Stampin' Up! snap cases (recycled from my unmounted stamps!)

I labelled them by theme and added a code letter.
I pack the case tightly with stamps!

Keeping the lid on I place the stamp case on my scanner/printer/copier and copy it 2 times.
1 copy is trimmed and included in the case so I know what stamps are in there but  more importantly what stamps need to go back in this case!
The second copy is hole punched, labelled with the case code letter and inserted into my stamp inventory binder.

It's so easy!!

As for my clear polymer and rubber cling mount stamps I use a combo binder & bin system. 
I'll share more of that another day when I finish the inventory!


Thursday, April 12, 2012

More Organizing!

PUNCHES
Even though I have lots of Sizzix Dies and Nestabilities I still like to use punches.  They are quick and convenient when you have space to store them properly!

I've outgrown my current storage system - I thought I had this under control by using these IKEA racks to hold my "mostly used" punches
and a "behind the door" shoe holder for my border punches and new Stampin' Up! flat style punches.


I love having my punches out in the open like this but now I've run out of room and have gone back to putting punches in drawers.  And they don't get used if they're not in view!

I've cleared a space on my desk and I'm thinking of adding a 3rd row IKEA rack (on the right).  Unfortunately IKEA doesn't sell the kind I bought anymore so I'll have to find one similiar. 
OR maybe I just need to get rid of some of my punches? 

RIBBON
I have so much ribbon you would not believe it.  I admit it - I'm a ribbon hoarder!
I won't even show you how much ribbon I have but I will show you how I store my "mostly used" ribbon.

I have 3 Making Memories Embellishment centres but I choose not to use the ribbon dowels. 
Instead I use these Store In Style Ribbon Spool Stackers and sort my ribbon by colour or theme.


I like this pant hanger idea but I can only use 2 of the 4 rods!

I just used one that I had at home but if you're shopping for one of these I would suggest you take some spools of ribbon with you to test out the space between each rod.


This is only a small fraction of my ribbon "collection" and if I wanted to really organize it I would need one (or more) of these bad boys. 
 Isn't this amazing!! It's made by Patty and her husband.  Click the photo to read more about it.
You can keep it out or slide it into a cupboard (if you had an empty cupboard that is!).

OTHER EMBELLISHMENTS
For other embellishments I use these Making Memories drawers which fit perfectly in the Embellishment centres.
I also use these clear plastic craft jars (large and small)
but mostly I keep my embellishments (stickers, rubons, glitter, brads etc)  in Best Craft Organizer drawer units like this.

STICKLES
I really like how Shannon stores her stickles using a cookie sheet and magnetic circles. Click the photo to read about it on her blog.

Stickles storage

But I don't have a lot of Stickles or Glitter Glue bottles so I just needed something smaller. 
I used to keep them on my desk top but in an effort to clear some space for another punch rack I opted for a Best Craft Organizer Dazzle Caddy.  I got mine at Scrap Arts and I use both the base and the lid to store my glitter bottles.


If you have any suggestions to help me (and others) with storage ideas for punches, ribbon, or embellishments please leave a comment.

Until Next Time!
Marie

Spring Fever - Organizing time!!

I've been trying to de-clutter my craft room for the last month or so but it's such an overwhelming job that I keep stopping and starting.

And I've got a few other things on the go right now that keep pulling me away from this task.


Last night I went through my loose wooden stamps (yes I still have some on wood blocks!) and I pulled out a quite a few (this cupboard was full!) but I'm still keeping so many. 

I kind of forgot what I had - out of sight out of mind I guess!

Makes me wish I had kept a catalogue of my stamps from the beginning or finished the ones I tried to start over the years.

When I get overwhelmed in my craft room I move into other areas of the house to de-clutter.

My daughter is moving out and so I've been going through my whole house to see what I can "donate" to her.  This is really helping me de-clutter!

I've gone through my kitchen drawers, linen closet, and garage!

To help keep me motivated I've been watching some videos and following a fellow blogger as she goes through a  "cleanse" of her craft room.

Click HERE to see an organizing expert tour her super organized condo.  Very motivating but kind of extreme!!

Click HERE to see Justine, a scrapbook consultant, tour her organized craft room.  There are some great tips in this video!

Click HERE to follow along with Kate Palmer on her Sparkle Tart blog as she works on a 30 DAY CRAFT ROOM CLEANSE.

I hope this helps to motivate you to keep your room tidy or re-organize if you need to!

Until Next Time!
Marie

Thursday, March 15, 2012

Cutting up your embossing folders? What the heck!

I just saw that Sandy MacIver cut up her Finial Press embossing folder - check THIS out! 

If you watch her video she shows you how she cut hers up around the 7 minute mark.

I thought this was very extreme and not something that I would have ever thought to do with mine.

So I Googled it....and you know what other people do it too!

Dawn Griffith also did this HERE where she shows how she cut an oval out of her Petals a Plenty embossing folder. 

You don't have to cut up your folder - you can achieve the same effect by cutting a chipboard mat to use on top of your folder in your sandwich.  Click HERE to see how that is done.

Maybe I'm out of the loop here but I had no idea that crafters were cutting up their folders.  Did you?

I don't think I could do that to mine - I like them the way they are.

If you've done this and would like to share please leave a comment here.

Until Next Time!
Marie

Wednesday, March 14, 2012

Use your stuff!

I'm cleaning out my craft room again and while I do this I'm re-evaluating some of my craft stuff.

I have a lot of stamps, tools and supplies and I hardly use some of them! 

My local scrapbooking store - Scrap Arts - will take some of this stuff off my hands for store credit.  How awesome is that!!

While I go through my neglected craft tools and supplies I thought I'd start a feature called "Use your stuff!" to help me re-learn how to use some of it and also decide if I still needed the tool or supply item.

Today's post is about the SCORE BOARD tool. 

I have several and I like different ones for different reasons and every time a new one comes out I feel compelled to buy it.  But really I just need to use the one(s) I have!

I like the Scor-Pal for the self healing mat that sits right inside and I especially like the Scor-Buddy for taking along in my craft tote. But the bone folder thingy that comes with it doesn't work for me so I've used a stylus with it. 


I like the Martha Stewart Score Board for the 1/8" score lines (right across the board) and the envelope template included (it slides under the board for storage).  I really like that it has stickers with card sizes and where to score, box sizes and envelope sizes too and a flip up storage compartment.  So no instructions to hunt for when you're trying to make something! And again I use a stylus with mine not the bone folder thingy it comes with. 


I like the Stampin' Up! Simply Scored one because it comes with 3 place markers and a stylus - YAY! and now there is an add on Simply Scored Diagonal Plate.  This sits on the score board and allows you to score up to 12x12 paper. .

Simply Scored - by Stampin' Up!
I don't have this one but I am very tempted to buy it because it has all the features I like...

but I think I'll pass on it for now since I already own 2 others.

Now getting on to using a score board tool....

I'm pretty sure if you've got one you've probably got the hang of using it for scoring cards but I've been using mine to make envelopes lately and I'm loving it.

I made up some sample envelopes using coloured printer paper.  I'm very visual and I  love to have samples that I can look at!


One of the things I found was that the envelopes are quite a bit bigger than they need to be for the cards they're meant for.  I guess that's not really a bad thing if you've got a thicker card (with lots of layers/embellishments) that doesn't fit in the standard A2 envelope. But I sell my cards and these don't fit in the standard sized cello envelopes.

Now if you have 3D stuff on your cards - like this card I made at a Scrap Arts Make and Take - you might want something with room so that the 3D part doesn't get flattened.


I found this awesome BLOG POST by Kim Duran on how to make a box-like envelope for heavily embellished standard sized cards.

 See how nicely the card fits in there....

Not sure how this would go through the mail - maybe someone can comment on that - but it's perfect for this kind of card and hand delivering!

If you've got some score board tips or comments to share I'd love to read them!

Until Next Time!
Marie

Friday, December 9, 2011

Flower Punch Tree

Check out THIS VIDEO on how to make a beautiful Christmas tree out of punched flowers.

I have to try this for myself it's sooooo pretty!

Until Next Time!

Marie

Wednesday, December 7, 2011

Ornament Wreath

How do you like this ornament wreath that I made?


 You just feed ornaments on to a wire coat hanger.  Then you use the hook in the hanger to hang it up.
I don't really like that the hanger hook is showing....

 And it kind of sticks out quite a bit on the door. 
This wouldn't work if you had a screen door on top of your front door!

I got my ornaments from Bed Bath and Beyond - a package of 41 for $13.99. 

I bought 2 packages to make this wreath (yep 82 balls!). 

You can find unbreakable ornaments everywhere for different price points - I saw some great ones by Martha Stewart at Home Depot - but the reason I choose these ornaments was because of the colour combo (red, green and gold) and there were both shiny and glittery balls in 2 different sizes.

I made this ornament wreath using THIS TUTORIAL.

If you are a visual learner click HERE and HERE for videos.

There are lots of different versions of this oline and I might take mine apart and do it on a wreath form.

I found THIS ONE - without using the hanger on a foam core wreath.

THIS ONE using a green wreath base.

Until Next Time!
Marie

Tuesday, December 6, 2011

TIP: Converting stamps to clear mount

If you are like me and have been at this hobby - stamping - for a while now you will probably be running out of room for all your stamps.

Years ago I started unmounting my wood mount stamps and rollograph wheels and now I mostly buy unmounted or even digi stamps. 

But I have a ton of stamps still on wood that I really must do something with.

Today I came across this blog post in my favourites and I thought I would share it with all of you.  In case you haven't seen it that is!

I really like this post because it's simple to do for stamps that you haven't mounted yet -use the stamp image stickers and tombo mono glue to "convert" the wood mount stamps into clear/cling mount ones. 

BUT I also love her TIP of peeling off an old sticker from the wood block and using that again on your rubber.  I hadn't thought about that and I did throw out a bunch of them in my frenzy to unmount!

Until Next Time!
Marie

Sunday, November 20, 2011

Tip - Inking blank spots

Does this ever happen to you?


I just love this solid image stamp (Dasher from Stampin' Up!) but I hardly ever use it because I sometimes get a "missed" area when I stamp.

I saw on Mary Fish's blog how she uses a blender pen to "fix" this blank spot and so I tried it.  I squeezed my ink pad (SU! Cherry Cobbler) to get some ink on the inside lid and then I dipped my blender pen (NOT aqua-pen) in the smudge and then applied it to the image.

Voila! Check out this "fixed" image.


It really works!

Another great tip Mary suggested was to ink up the stamp with the pad on top rather than tapping the stamp on the ink pad.

Until Next Time!
Marie

Saturday, September 24, 2011

Tip - Die Cutting Stamped Images

Here's an easy tip for die cutting your stamped images with open type dies (like Nestabillities).


Use a post it note or piece of painter's masking tape to hold the die over the image EXACTLY where you want it while you run it through your die cutting machine.

Isn't that a great idea?  I saw it on Jennifer McGuire's blog.

Until Next Time!
Marie

Tuesday, September 20, 2011

Tip: Floss Threader

Do you know what this is?


Maybe if you had braces or kids with braces you would know that this is a floss threader.  You can find them in the dental section of most stores.

Here's a craft tip for you - these little things are PERFECT for threading ribbon or string through button holes and bells.

I like to keep a couple of these in my craft tote 'just in case".

I thought you might like to know...if you didn't already....

Until Next Time!
Marie

Thursday, August 25, 2011

Extend the use of your Open type dies!

Do you want to see something that will inspire you to use your open type dies and off cuts from other dies in new ways?

Check out THIS VIDEO from Sarah Gough.

Until Next Time!
Marie

Wednesday, August 24, 2011

Have you seen this???

I just love buying little paper flowers to use on projects - but I'm hoarding them because I don't ever want to "run out"! 

OR maybe I feel like the person I'm making the card for isn't "special" enough for me to use up my stash!

Either way I know I need let go a bit and use up more of my stuff. 

It will be a lot easier for me now since I found some awesome videos on how to make your own "prima" type flowers.

I know there are many videos out there and it can get overwhelming jumping from link to link but I came across THIS ONE and I especially LOVE this one because you can make it with pretty much any circular, star or flower type punch or shapes cut from your dies or cricut machines!

Check THIS video out from Jules (aka Jannaviles)

Until Next Time!
Marie

Thursday, August 11, 2011

TIP - ID your Copic Markers!

One of the things that I tell everyone BEFORE attending a Copic class is to label their markers.

There are a few ways to do this easily.

1.  Use another Copic marker (Black)  to write your initials on the barrel of each of your markers.  The advantage to this is that if you ever need to get rid of it (ie. if you sell/trade your markers) you can just use the Blender solution (or hand sanitizer) to remove it. 
If you don't have a Black Copic marker you can use a Sharpie pen but be careful not to use your blender pen to remove that ink as the Sharpie ink will stain the Blender pen nib and may transfer later when you don't want it to! 
Another advantage is that if you ever leave behind or misplace the marker it will make it easy to identify it with your initials.
The disadvantage to this method is that you can't label the marker your using to label your markers.  In this case I would just borrow someone else's (same colour) to label that marker.  DYKWIM?

2.  Use your label maker (who doesn't have one of these???) or print labels off your computer to make personalized labels and apply those to the barrell of your marker.

3.  Use some kind of coloured tape to wrap around your marker.  I personally use thin purple coloured masking tape for my markers.  I like that I can easily visually spot which markers are mine.


My daughter has her own markers now and I used the tape idea to label hers. 

She picked out PINK hockey tape!


Since she's also taking them away to school with her in the fall I'm going to add her initials to each one as well.

Whatever method you use make sure that as you add to your collection of markers you are able to continue with the same labelling process.

If you have any other ideas for labelling your markers please leave a comment.  I'd love to hear it!

Until Next Time!
Marie

Saturday, July 9, 2011

Copic Swatch Book and Work Book

If you are a Copic "user" with a lot of markers then you understand how overwhelming it can sometimes be trying to find the right colour for your projects.

A few years back - when I first started "collecting" my markers - I made myself a swatch book from a file that was shared online. 

It was great for keeping track of all the colours I had and what I "needed".

After the addition of the new colours last year, my book was out of date and so I made myself a new updated one and changed the format to one that worked better for me.

ETA: 08/05/11 I've got a few of these made up and ready to mail out.  Please check out the Copic Reference Booklet page tab at the top of my blog for more information.


As well as updating my Swatch Book I put together a Work Book for myself.  In here I keep all of my stamped and digi images that I've coloured and any blanks I have waiting to be coloured.


If you haven't done this for yourself I highly recommend it!

Until Next Time!
Marie

Friday, April 29, 2011

TIP: Setting Brads

I have the Stampin' Up! Mat Pack and I love it!

Mat Pack - by Stampin' Up!

 But sometimes I want to set brads or eyelets in a curve or shape.

So I've added a few additional pieces to my Mat Pack.

Check this out:


The paper strip is the top perforation on an old order form (you could also use a ring notebook page) and the plactic pieces I found in the sewing aisle with the embrodiery floss.  Sorry I don't even know what they're called!

I keep it all in the original plastic baggie that the Mat Pack came in.

Until Next Time!

Marie

Monday, April 25, 2011

Ribbon Flowers

Ribbon flower embellishments are so popular right now.  Not just for paper crafting but for home decor and clothing too!

I use them and wear them and I love them!

Tatertots and Jello: Guest Post -- make a Nautical, Anthro-inspired Necklace!!

You can jazz up any project with a few of these and they are easy to make yourself too.

I love THIS POST because it shows 16 different flowers and links to tutorials on how to make them!

 Until Next Time!
Marie

Monday, April 18, 2011

TIP - Tool time with Marie!

I wanted to call this post - Pimp my Big Shot! 

But other than add a few rhinetsones and glitter letters with my name spelled out I haven't really "pimped" my Big Shot at all or at least enough for a post!


So this post is not about that but it is about altering it to make it work more effectively for me (and maybe you too?).

Today's tip is using a tool (screwdriver) on a crafting tool (Sizzix Big Shot - actually the MPP).

Do you find that your Tab 2 on the Multi-Purpose-Platform (aka MPP) gets in the way?

I hardly ever use it and so I'm always flipping it over and out of the way.

But now that I've finally cleared off my desk enough to give my Big Shot a permanent home - handy so I can use it more - that flapping tab gets in my way all the time!

So why not remove it?

Please note: I said flapping tab not flapping flab! If I had a tip for removing that I'd be a millionaire and my own best customer!


Using a small cross head screwdriver (aka Phillips) I took the Tab 2 off.

But wait there's more....

I didn't stop at Tab 2 I also removed Tab 1 and the hinge on the side. 


I'll keep the hinge and the tiny screws somewhere safe in case I want to add that all back on - see a future post on "How to put your MPP together after you've removed your tabs". Just kidding!

Now I can just add the tabs whenever I need them in a "sandwich".  I'll store the tabs I'm not using under my Big Shot so they don't accidentally get filed somewhere.


Until next time!
Marie