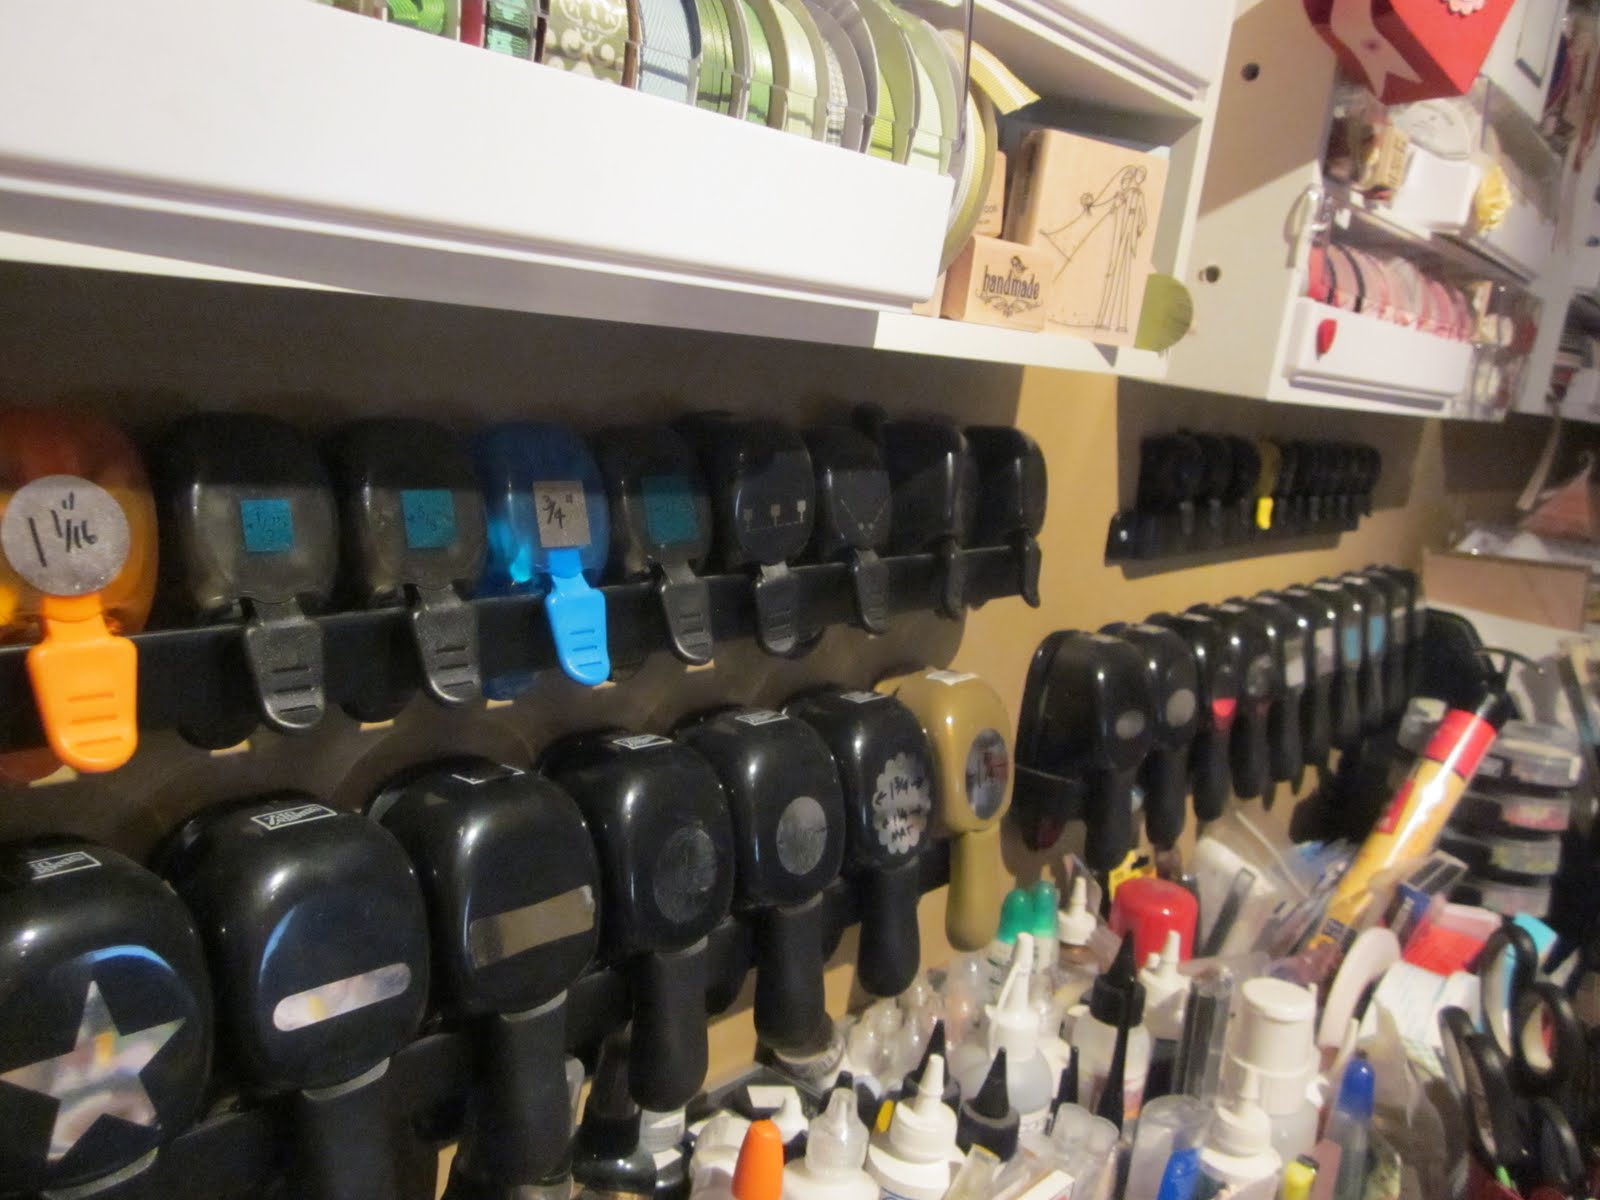
Showing posts with label Storage. Show all posts

Wednesday, April 25, 2012

More Photos for Stamp Organization

Sheri left a comment asking to see my bins.

So I thought I'd post more photos with less writing....

I use these Martha Stewart CD bins (discontinued) to store my unmounted Stampin' Up! stamps:


I've labelled them (yes I will be redoing the labels) and numbered them - the number corresponds to pages in my stamp binder.

Each bin holds 30 CD cases.

I print off 1 page of stamp images for my stamp binder and
another I fold lengthwise and put in the stamp bin.
If the stamp set in the CD case is missing an image sheet then I print off an enlarged copy of the image and include that in the CD case.  Most of my stamps are older and were missing image sheets!
For my non-Stampin' Up! stamps that are still wood mounted I use a different system.
I keep them in Stampin' Up! snap cases (recycled from my unmounted stamps!)

I labelled them by theme and added a code letter.
I pack the case tightly with stamps!

Keeping the lid on I place the stamp case on my scanner/printer/copier and copy it 2 times.
1 copy is trimmed and included in the case so I know what stamps are in there but  more importantly what stamps need to go back in this case!
The second copy is hole punched, labelled with the case code letter and inserted into my stamp inventory binder.

It's so easy!!

As for my clear polymer and rubber cling mount stamps I use a combo binder & bin system. 
I'll share more of that another day when I finish the inventory!


Tuesday, April 17, 2012

Getting there...

April 17, 2012

Last night I loaded up my thrift store spinning thingy with my technique swap samples. 

Now all I need to do is give it a spin to be inspired to try a new technique!
Over the weekend I made a quick dash out to IKEA and picked up a couple of kitchen racks to accomodate more punches.  See the new longer rack on the very bottom?

I added a smaller one here for more punches and I found a space for my flat SU! punches too!
I was a bit bummed that they didn't have the same kind of rack as what I started with but this style is ok and with all the punches you can't really see the rack!

I also finished my mother-in-law's birthday gift - I made her a bronze and gunmetal chainmaille bracelet. 


Until Next Time!
Marie

Thursday, April 12, 2012

More Organizing!

PUNCHES
Even though I have lots of Sizzix Dies and Nestabilities I still like to use punches.  They are quick and convenient when you have space to store them properly!

I've outgrown my current storage system - I thought I had this under control by using these IKEA racks to hold my "mostly used" punches
and a "behind the door" shoe holder for my border punches and new Stampin' Up! flat style punches.


I love having my punches out in the open like this but now I've run out of room and have gone back to putting punches in drawers.  And they don't get used if they're not in view!

I've cleared a space on my desk and I'm thinking of adding a 3rd row IKEA rack (on the right).  Unfortunately IKEA doesn't sell the kind I bought anymore so I'll have to find one similiar. 
OR maybe I just need to get rid of some of my punches? 

RIBBON
I have so much ribbon you would not believe it.  I admit it - I'm a ribbon hoarder!
I won't even show you how much ribbon I have but I will show you how I store my "mostly used" ribbon.

I have 3 Making Memories Embellishment centres but I choose not to use the ribbon dowels. 
Instead I use these Store In Style Ribbon Spool Stackers and sort my ribbon by colour or theme.


I like this pant hanger idea but I can only use 2 of the 4 rods!

I just used one that I had at home but if you're shopping for one of these I would suggest you take some spools of ribbon with you to test out the space between each rod.


This is only a small fraction of my ribbon "collection" and if I wanted to really organize it I would need one (or more) of these bad boys. 
 Isn't this amazing!! It's made by Patty and her husband.  Click the photo to read more about it.
You can keep it out or slide it into a cupboard (if you had an empty cupboard that is!).

OTHER EMBELLISHMENTS
For other embellishments I use these Making Memories drawers which fit perfectly in the Embellishment centres.
I also use these clear plastic craft jars (large and small)
but mostly I keep my embellishments (stickers, rubons, glitter, brads etc)  in Best Craft Organizer drawer units like this.

STICKLES
I really like how Shannon stores her stickles using a cookie sheet and magnetic circles. Click the photo to read about it on her blog.

Stickles storage

But I don't have a lot of Stickles or Glitter Glue bottles so I just needed something smaller. 
I used to keep them on my desk top but in an effort to clear some space for another punch rack I opted for a Best Craft Organizer Dazzle Caddy.  I got mine at Scrap Arts and I use both the base and the lid to store my glitter bottles.


If you have any suggestions to help me (and others) with storage ideas for punches, ribbon, or embellishments please leave a comment.

Until Next Time!
Marie

Sunday, June 19, 2011

Question and Answer: Copic Storage

One question I get asked a lot is "How do you store your Copic markers?"

I've posted before that I store mine vertically (yes it's ok to store Copics this way) in a clear plastic retail display unit I got over 2 years for about $50. 

ETA 6/21/11: The measurements for this unit are 10" x 16" x 4"

It fits on my counter under my bookshelf.
When I want to use them I slide the unit out onto the counter and take out the markers I need.

Before I got this unit I used to store my Copics in an over-the-door shoe holder with clear plastic pockets.


But as my marker "collection" grew I ran out of space - I think this one held approx 120 markers.

I really liked how it was out of the way yet easy to access and portable.  I could roll it up and take it with me whenever I needed to travel with my markers or even go into another room.

I CAN take my current display unit out of the house but it's heavy!  I've got all 346 markers in there now. 

Luckily I found this tote bag that is the perfect size to slide the display unit in and it has good strong handles for carrying.


How you store your Copics depends on how many you have, where you have space for them, and how much you want to spend.

Click HERE to see a post I did over a year ago on Copic Storage with links.

Below are a few more new storage ideas that I've discovered - from custom made units to simple everyday containers.

Solutions 3 Color Cubbies
Solutions 3 Colour Cubbie in use

Pampered Chef Rotary Tool Caddy

Beverage Container from Target

Wine Rack and DIY Make Your Own out of PVC drain pipe

Make your own out of Slim Jim containers

Make your own out of a cereal box!

Make your own out of foam core display boards!

Individual buckets


Enjoy!

Until Next Time!
Marie

Friday, June 17, 2011

Bin Storage from Costco

Today I went to Costco with my friend Darlene.  I only needed 2 things so I went along with her for the ride and the company.

She drove so that helped me to only get what I needed. 

Most of the time I go in for a couple of things and come out $300 poorer with tons of stuff I didn't know I needed!  Does that happen to you too?

Anyway Darlene had a big shop to do so while I was there I cruised the aisles and found this....

 It's a bin storage rack system from Whalen. 
Click HERE for a link to the Whalen website for more views on this.


I know that if I had my own car I would have found a way to bring this home with me!  I'm not sure where I would put it but I could certainly fill it up!

Is this more industrial look a trend for residential/craft room storage? 

I just read that Andrea Walford has gone to the bin storage system too.

Click HERE to see her new storage system from Uline.

I think I still like the pretty rather than the practical look for my crafting area but I find myself looking around the house to see where I could put one of those bin racks.  Maybe the garage?

Until Next Time!
Marie

Saturday, June 11, 2011

Punch Storage & Custom Craft Space

I often get asked - How do you store your punches?

Storage is an ongoing issue for me because I have soooo much stuff and I keep buying more! 

But as I tell all my crafting friends - keep your craft stuff where you can see it and access it.

Out of sight, out of mind!

Which for me means if I don't have it handy and ready to use I forget about it and I don't use it.  OR worse yet I buy duplicates!

What a waste!

So even though my desk and work area is very cluttered I have most of my tools and supplies handy!

I used to keep my punches in a drawer like this and they hardly got used or more like I'd be too lazy to dig them out and find what I needed.


So what I did a while back was I hung them on my wall!


I bought 3 of the Ikea Kroken kitchen rails and one of the matching magnetic knife rail. 
This is what it looks like "naked".
Unfortunately they are no longer available but Ikea has others that work just as well.

This is the Bygel Rail - it's super cheap and comes in 2 lengths.  Click the photo for more info.


There are so many interesting and different storage ideas on the internet now. 

You can pretty much find anything you need just by Googling it!

And lots of lucky women have their own "custom" or makeshift craft spaces. 

I fell pretty lucky to have 1/2 of our main floor den - I share the other half with my son and his gaming system.

If you haven't already checked out Crafty Storage you should!  There is lots of info and sharing going on there and you may find some ideas that will help you.

Right now I can think of a couple of women who are showcasing their "renovated" craft rooms.  One is Nicole Heady (from Paper Trey Ink) and the other is Mary Fish.

HERE is what Nichole's old room looked like.  Isn't it gorgeous!!!  She is re-doing it but I can't find the link right now so I'll post the link to her updated room as soon as I find it!

THIS is what Mary's old room looked like and now she is installing a custom craft room after her move to another state.  If you are interested in seeing a custom craft room being built please click HERE to go to Mary Fish's blog.  She is setting up her special place - it's amazing - and she uses the Bygel rails for her punches.

Everytime I see an update from these ladies it makes me want to purge and re-oganized my space!

I hope that you get some craft room/space inspiration by visiting their spaces.

Until Next Time!
Marie

Thursday, January 20, 2011

Cleaning up my craft room....

Sorry I haven't been on much lately - lots of running around with the kids!

I've got a boy playing/participating in 4 sports right now and a daughter who is learning to drive on her own (she got her N license in Sept).  We just picked up the cutest MINI COOPER!!! and we are all having fun driving it around (well at least 3 of us are).


Today I've been getting ready for my Heat Embossing class on Saturday AND a Scrap/Craft Garage Sale next weekend.  If you're in the North Vancouver area you should check it out - it's Sunday January 30th at ScrapArts.

So I've been moving stuff around and PURGING - seriously if I didn't even know I had it how come I'm hanging on to it?  YES I'm cleaning up my craft room AGAIN!

TIP: Did you know that you can use your Sizzix Silicone Mat (SU! #114615) to pick up excess glitter off your work surface, your floor, your chairs, your body!?


It works great for paper dust and regular dust too - I tell you some of this stuff has been sitting on my desk for a while!
Maybe you already knew that but I just discovered this and I think it's the greatest thing!!! 
Once you're done cleaning up just rinse off the mat with warm soapy water and let it dry.

TIP: I've reorganized my ribbon "collection" too.  I saw this idea on Sharon Harnist's blog and I thought to myself "I've got some of those and I'm going to do the same thing!".

So I did....

I even went a step further and took the dowels out of my Making Memories Embellishment Centres and put these Store In Style Ribbon Spool Stackers in instead.  Doesn't it look better?


 I went through all my ribbon and tried to "group" the ribbon by colours and theme. 
The ribbon stackers looked kind of plain (white on white) so I attached an embellishment to it -
this is a "faux" metal tag with a small green flower on the green ribbon stacker.
 You might notice that I've turned my embellishment jars on their sides too. 
I don't know why but the "newer" ones I bought at Michaels are just a bit too tall for my shelves.
I don't mind them this way - I can still see what's inside.
 I moved a bunch of things around and I'm very happy with how it turned out. 
Here I used one of my Stampin' Up! punches to make labels for some of my jars
Until Next Time...
Marie

Wednesday, October 27, 2010

Whatever Wednesday - Ink Organization

Why is it that by this time in the week the kids (both teenagers in high school) give me so much grief in the morning about getting up and out the door for school?

Seriously I'm ready for a drink by 9 am!!

I guess that's why Wednesday is called HUMP day!  So tough to get over the hump and then it gets easier in anticipation of the weekend.

Well enough of that!  Let's get on to today's topic - Organization!

This is one of my favourite pastimes - organizing my stuff.  GROAN!!!

Today let's talk about storing ink pads.  How do you store your ink pads?

I used to keep mine in shoe boxes.  SERIOUSLY!!!

I can tell you that some colours never got used because it was the favourites at the top of the box that were grabbed the most.

I was so thrilled when Stampin' Up! came out with the Colour Caddy.  By that time I needed 2 of them and the extender kits! 


And if I remember correctly I "gifted" them to myself for Christmas!!

The one on the right holds all of my current Stampin' Up! Inks and refills and the one on the left holds my "other" inks and refills (Stazon, Brilliance, Kaleidoscope and retired Stampin' Up! inks).  Yes other ink pads do fit in this caddy!


These hold 60 ink pads each.  I keep both on them on the top shelf in my craft room. 

I put them here originally to keep them out of the kids' reach and now that the kids are older it's not an issue but this is where the caddies live and it works for me. 

And YES they do SPIN around on the shelf and NO they don't BANG into each other.  I was lucky that this built in had adjustable shelves and was deep enough for these.


To help keep my inks organized I used Stampin' Up!s word window punch and punched out labels for the side of the ink pad.

I downloaded the Ink Pad and Ink Caddy Labels from Organized Stamping  HERE.

It's easy to keep them organized this way and I can quickly take inks in and out and know when one is missing.

Now this is just one way to store your inks.  There are lots of other ways - I've seen repurposed cassette cases, custom made units, Ikea products etc.

So if you've got your inks in a shoe box or somewhere else and you have the room you might want to consider bringing them out so you can see what you have and USE THEM more!


Thursday, October 7, 2010

Embossing Folder Storage Idea

Storage - it's one of the biggest issues I have with papercrafting and all it's tools!

The other day I wanted my Swiss Dots Cuttlebug embossing folder and it took me 20 minutes to find it!

So I found a little mini milk crate, labelled my folders with a Sharpie marker, and alphabetized them by Designer.

Check this out:

Yes I know the folder names appear upside down - or so it would seem - but when I'm using them in a class or for a demo they are right side up.

Besides I can read them easily if I position myself over the crate while I flip through them!


This works for me - maybe it will work for you too!