
I have so much glitter in the house - seriously you'd think that fairies and pixies lived here!!
I thought I'd put together a bit of an information post for glitter to help others that might be venturing into the wonderful world of glitter! OR even those that have tried it in the past but have forgotten how great it is!
First of all - I don't have to tell you that glitter can be MESSY! But it doesn't have to be too messy if you prepare a bit before. Regardless of what you do - you will end up with some glitter on yourself and will look like a "disco queen wannabe" by the time you're done!
It happens to everyone - someone once said that glitter is like the herpes of the craft world!
I like to work on a self healing mat so that I can clean up easily. I also like to use a piece of scrap paper (folded in 1/2) to catch the excess glitter. If you are working with multiple colours/types then you should have a separate piece of scrap paper for each one so you don't cross-contaminate your glitter.
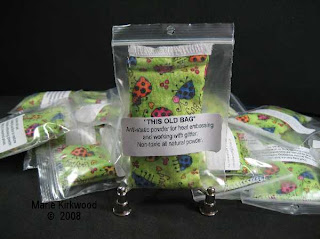
To help keep yourself and your project static free I like to use a anti-static pillow like "This OLD BAG" which I sell at Scrap Arts or through me directly (just email me). It's great for working with glitter and embossing powders.
The type of glitter you select for a project really depends on what you want to achieve.
Textures:
Microfine - micro particles of glitter perfect for creating the Burnished Velvet look
Ultrafine - fine glitter smaller in size than regular craft glitter but more brilliant than the Microfine
Chunky/Craft - Chunky glitter is a larger cut for more brilliance but a bit harder to adhere
Effects:
Opaque - this glitter will cover whatever color it is applied on/over
Transparent - this glitter is see-through and it's outcome is affected by the color beneath it
Transference - this glitter will have an underlying colour and when applied on certain colours will show through - example - Warm/Cool/Green Highlight glitter
Perlescent - this glitter can be both opaque and transparent but it has a "satiny" pearl like finish. "PearlEx Micro" for example can easily be mixed with glues and sprayed on using hairspray for a subtle effect.
Glitter comes in all kinds of containers too. For the most part I keep my glitter in it's original container but if you find that you are using more of one particular colour - like red at Christmas or white/highlight glitters for snow - then you may want to transfer them to bigger containers with snap lids for ease of use.
Application:
There are lots of adhesives available that make applying glitter easy. You just need to find the right one for your project and the look you want to achieve.
Sakura Quickie Glue Pen - This is one of my favorite ways to apply glitter - it's both quick and easy! You can highlight a small section of a stamped image or patterned paper by drawing where you want the glitter to go. Apply liberal amounts of glitter over the glue and tap to remove excess. It goes on blue so you know where you've applied it and it dries clear. ($4.99)
Tsukinkeo Essential Glue Pad - When working with stamps this is the quickest & easiest way to apply adhesive. It works just like an ink pad. "Ink" up your stamp with this adhesive and stamp onto your surface. Or you can apply the glue pad directly to your project or chipboard piece. Apply glitter. This type of adhesive is an easy option when working with solid image rubber stamps and a lot less messy than liquid glues when working with chipboard. The only downside to this glue pad is that the pad comes uninked (a reinker bottle is included) and you might have to re-ink it before using each time ($10 - $15).
Liquid Glues - There is a lot of different types of liquid glues available and you probably have some in your house. BUT I have to WARN you that not all liquid glues are the same. Some have higher water content than others which can cause your paper project to buckle and warp.
The 2 liquid glues that I like to recommend are:
- The Art Institute - This liquid glue is made by the Art Institute (in Arizona) and is designed specifically for use with glitter. Read the labels carefully as some of this brand of glue dries Clear and some dries White - both have their benefits when used properly. On the downside this glue is hard to find and somewhat pricey ($15.95 for 4 oz of Dries Clear glue).
- SOBO - Made by Delta and available at most craft stores. This liquid glue dries clear and does not warp paper. It's very reasonably priced as well ($3.99 for 2 oz or $14.99 for 16 oz)
Fabric Dimensional Paint - this is a fun way to apply glitter when you want it to have some dimension!! It may take a bit of practice and it's almost like cake decorating but you can make some beautiful results using this. I prefer to use the white or the transparent clear rather than colours. Although using the coloured fabric dimensional paint is awesome when working with the "highlighted" Transference glitter. It's a fun surprise to see what colour you end up with! (Tulip Matte Dimenisoal Fabric Paint $4.97 for 4 oz).
Double-sided Adhesive Tape/Sheets - Double sided adhesive tape/sheets are available from many different manufacturers and are great for adhering glitter over a variety of surfaces. This product can be free hand cut with an exacto, die-cut or punched to create fun shapes that can be applied to your project and then covered with glitter. You can even cover a stamped or patterned piece with an entire piece of the adhesive tape and apply the glitter on top for an overall effect. I've used the Sookwang tape and highly recommend it. It is available in many different widths and is very sticky - perfect for glitter.
 Other Suggestions:
- Use regular
acrylic paint! Most of us have some of this stuff lying around... Just apply a liberal coat to your project and then quickly add your glitter before it dries.
-
Glue dots - any size will do! Just apply in a row or pattern and then add glitter. It's a quick and easy way to add a bit of punch to your project!
Right now I'm in LOVE with Glitter Ritz glitter Grasshopper and Garnet in the Micro Fine!
I'm considering using both of these on my Christmas cards this year!

No comments:
Post a Comment